Difference between revisions of "The Dashboard (Home Page)"
From hoteliga
(→The Arrivals/Checked In/Departure Column) |
|||
| (33 intermediate revisions by 4 users not shown) | |||
| Line 1: | Line 1: | ||
| − | + | == Introduction == | |
| − | [[File: | + | The Dashboard, or the home page, is the first page that you see when you enter the system. |
| − | [[File: | + | |
| − | You can | + | In a normal day, the Dashboard would look like this: |
| + | |||
| + | [[File:Dashboard en.png|1200px]] | ||
| + | |||
| + | On the top area, there is always the black toolbar with three things: | ||
| + | |||
| + | {| class="wikitable" style="width:100%" | ||
| + | |style="width:50px;text-align:center"|1 | ||
| + | |Display of '''the current logged-in user''', in the form "username@domain". For example, if you are the user "reception" of domain "theboutique", it would display "reception@theboutique". By clicking on this menu, you can see the options of [[Changing Your Password|changing your password]] and logging out from the system. | ||
| + | |- | ||
| + | |style="width:50px;text-align:center"|2 | ||
| + | |"Options" is the '''quick access to all functionality''' of the system. For an administrator, that would be all possible options. But for another user created from the [[Users]] page, that could be less items, depending on the permissions that the user has.<br/>Note that this menu has more choices that the big buttons displayed in the picture with numbers 6-11. | ||
| + | |- | ||
| + | |style="width:50px;text-align:center"|3 | ||
| + | |Quick access to the '''help pages'''. | ||
| + | |} | ||
| + | |||
| + | Below the black bar starts the main content of the Dashboard: | ||
| + | |||
| + | {| class="wikitable" style="width:100%" | ||
| + | |style="width:50px;text-align:center"|4 | ||
| + | |Various '''important notifications''' about channel manager, overbookings, time zone issues etc. | ||
| + | |- | ||
| + | |style="width:50px;text-align:center"|5 | ||
| + | |'''Current local date and time''', updated every minute. The heart icon next to the date/time indicates the connection with the system.<br/>Note: It is important that the date and time coincide with the ones that you have in your device. If not, go to [[Regional Settings]] to adjust the time zone of your device. | ||
| + | |} | ||
| + | Below of the date is a black container with buttons that link to frequently used sections of the system: | ||
| + | {| class="wikitable" style="width:100%" | ||
| + | |style="width:50px;text-align:center"|6 | ||
| + | |Provides quick access to [[Customer Management|the customer management page]]. | ||
| + | |- | ||
| + | |style="width:50px;text-align:center"|7 | ||
| + | |Provides quick access to the [[The Reservations Calendar|reservations calendar]]. | ||
| + | |- | ||
| + | |style="width:50px;text-align:center"|8 | ||
| + | |Provides quick access to the [[The Reservations Table|reservations table]]. | ||
| + | |- | ||
| + | |style="width:50px;text-align:center"|9 | ||
| + | |Provides quick access to the [[The Room Layout|room layout]]. | ||
| + | |- | ||
| + | |style="width:50px;text-align:center"|10 | ||
| + | |Provides quick access to the [[Reports|reports area]]. | ||
| + | |- | ||
| + | |style="width:50px;text-align:center"|11 | ||
| + | |Provides quick access to the [[Settings|settings area]]. | ||
| + | |} | ||
| + | |||
| + | {| class="wikitable" style="width:100%" | ||
| + | |style="width:50px;text-align:center"|12 | ||
| + | |This column displays today's arrivals. | ||
| + | |- | ||
| + | |style="width:50px;text-align:center"|13 | ||
| + | |It indicates today's occupancy percentage. | ||
| + | |- | ||
| + | |style="width:50px;text-align:center"|14 | ||
| + | |This column indicates today's departures. | ||
| + | |- | ||
| + | |style="width:50px;text-align:center"|15 | ||
| + | |This column indicates the customers who are currently checked-in. | ||
| + | |- | ||
| + | |} | ||
| + | |||
| + | == Important Notifications == | ||
| + | |||
| + | |||
| + | Important notifications appear at the top of the main page. These notifications have to do with reservations from channels (new, modified or cancelled) or overbookings. By clicking on the reservation number you can access the reservation in question. | ||
| + | |||
| + | == Occupancy == | ||
| + | |||
| + | == The Arrivals/Checked In/Departure Column == | ||
| + | |||
| + | Various icons provide more information about a reservation: | ||
| + | |||
| + | [[File:arrival_en.png]] | ||
| + | |||
| + | [[File:Departure_1_en.png]] | ||
| + | {| class="wikitable" style="width:100%" | ||
| + | |style="width:50px;text-align:center"|1 | ||
| + | |This is the name of the customer. | ||
| + | |- | ||
| + | |style="width:50px;text-align:center"|2 | ||
| + | |An icon next to the customer's name indicates the category this customer belongs to (e.g. VIP). | ||
| + | |- | ||
| + | |style="width:50px;text-align:center"|3 | ||
| + | |This is the hoteliga reservation number. | ||
| + | |- | ||
| + | |style="width:50px;text-align:center"|4 | ||
| + | |If the reservation came from an agency, the respective icon is shown here. | ||
| + | |- | ||
| + | |style="width:50px;text-align:center"|5 | ||
| + | |The country flag indicates the customer's nationality. | ||
| + | |- | ||
| + | |style="width:50px;text-align:center"|6 | ||
| + | |By clicking on the reservation button, you can open the reservation to see more information or edit it. | ||
| + | |- | ||
| + | |style="width:50px;text-align:center"|7 | ||
| + | |You can mark the reservation as checked-out by clicking on this button. | ||
| + | |- | ||
| + | |style="width:50px;text-align:center"|8 | ||
| + | |It indicates number of adults. | ||
| + | |- | ||
| + | |style="width:50px;text-align:center"|9 | ||
| + | |It indicates number of children. | ||
| + | |- | ||
| + | |style="width:50px;text-align:center"|10 | ||
| + | |It indicates number of nights. | ||
| + | |- | ||
| + | |style="width:50px;text-align:center"|11 | ||
| + | |It indicates the board. | ||
| + | |- | ||
| + | |style="width:50px;text-align:center"|12 | ||
| + | |It indicates the room the customer is staying in. | ||
| + | |- | ||
| + | |style="width:50px;text-align:center"|13 | ||
| + | |Any notes left inside the reservation appear next to a post-it icon. | ||
| + | |- | ||
| + | |style="width:50px;text-align:center"|14 | ||
| + | |After clicking on the check-out button, this will show the check-out time stamp. | ||
| + | |} | ||
Latest revision as of 10:28, 28 January 2020
Contents
Introduction
The Dashboard, or the home page, is the first page that you see when you enter the system.
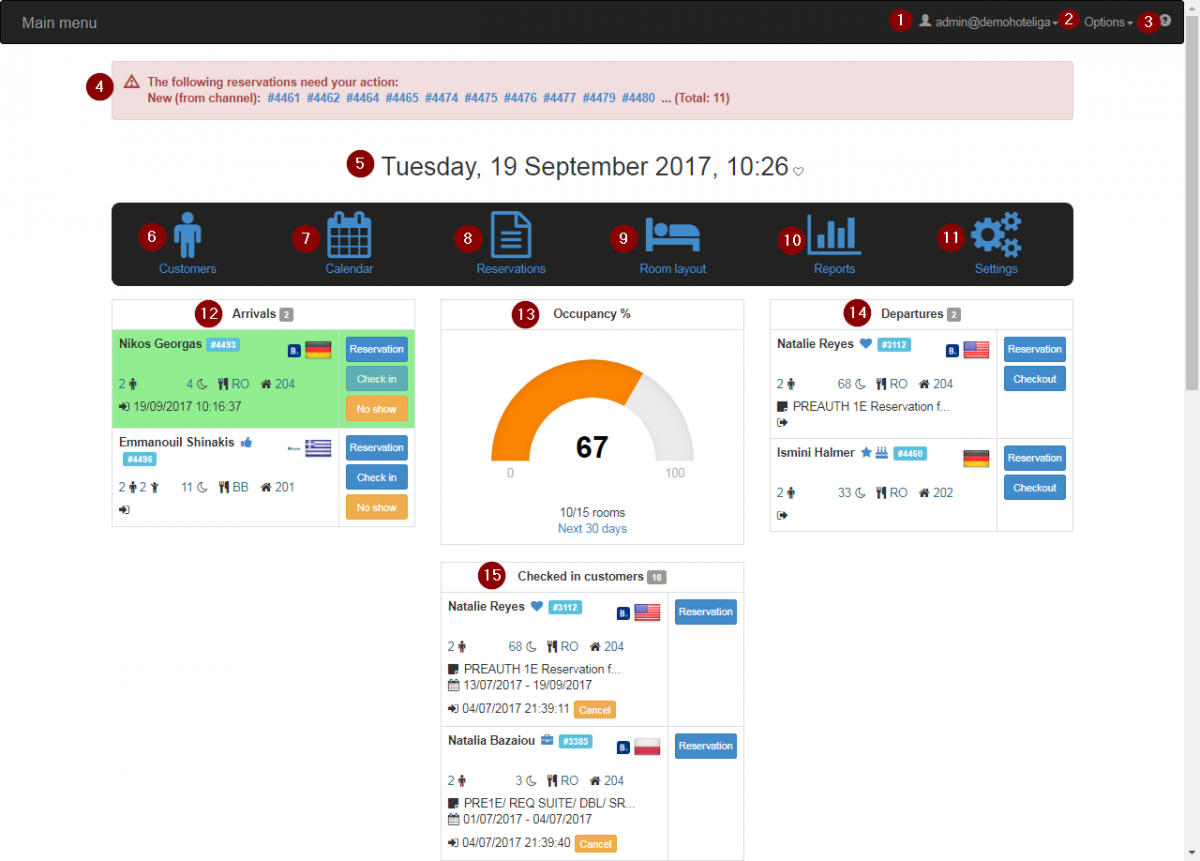
In a normal day, the Dashboard would look like this:
On the top area, there is always the black toolbar with three things:
| 1 | Display of the current logged-in user, in the form "username@domain". For example, if you are the user "reception" of domain "theboutique", it would display "reception@theboutique". By clicking on this menu, you can see the options of changing your password and logging out from the system. |
| 2 | "Options" is the quick access to all functionality of the system. For an administrator, that would be all possible options. But for another user created from the Users page, that could be less items, depending on the permissions that the user has. Note that this menu has more choices that the big buttons displayed in the picture with numbers 6-11. |
| 3 | Quick access to the help pages. |
Below the black bar starts the main content of the Dashboard:
| 4 | Various important notifications about channel manager, overbookings, time zone issues etc. |
| 5 | Current local date and time, updated every minute. The heart icon next to the date/time indicates the connection with the system. Note: It is important that the date and time coincide with the ones that you have in your device. If not, go to Regional Settings to adjust the time zone of your device. |
Below of the date is a black container with buttons that link to frequently used sections of the system:
| 6 | Provides quick access to the customer management page. |
| 7 | Provides quick access to the reservations calendar. |
| 8 | Provides quick access to the reservations table. |
| 9 | Provides quick access to the room layout. |
| 10 | Provides quick access to the reports area. |
| 11 | Provides quick access to the settings area. |
| 12 | This column displays today's arrivals. |
| 13 | It indicates today's occupancy percentage. |
| 14 | This column indicates today's departures. |
| 15 | This column indicates the customers who are currently checked-in. |
Important Notifications
Important notifications appear at the top of the main page. These notifications have to do with reservations from channels (new, modified or cancelled) or overbookings. By clicking on the reservation number you can access the reservation in question.
Occupancy
The Arrivals/Checked In/Departure Column
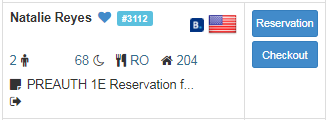
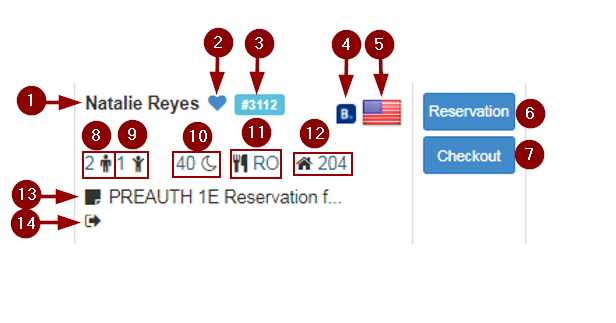
Various icons provide more information about a reservation:
| 1 | This is the name of the customer. |
| 2 | An icon next to the customer's name indicates the category this customer belongs to (e.g. VIP). |
| 3 | This is the hoteliga reservation number. |
| 4 | If the reservation came from an agency, the respective icon is shown here. |
| 5 | The country flag indicates the customer's nationality. |
| 6 | By clicking on the reservation button, you can open the reservation to see more information or edit it. |
| 7 | You can mark the reservation as checked-out by clicking on this button. |
| 8 | It indicates number of adults. |
| 9 | It indicates number of children. |
| 10 | It indicates number of nights. |
| 11 | It indicates the board. |
| 12 | It indicates the room the customer is staying in. |
| 13 | Any notes left inside the reservation appear next to a post-it icon. |
| 14 | After clicking on the check-out button, this will show the check-out time stamp. |


