Difference between revisions of "Booking.com"
(→Multiple day by day price lists or Season-based price list) |
(→Set Restrictions) |
||
| Line 90: | Line 90: | ||
== Set Restrictions == | == Set Restrictions == | ||
| + | In order to set restrictions you have multiple options. | ||
| + | |||
| + | === Option 1 === | ||
| + | You can go to '''Options > Channel Manager > Booking.com''' and Select '''Set Restrictions'''. | ||
| + | |||
| + | [[File:setrestr.png|800px|]] | ||
| + | |||
| + | In the pop-up window you select the dates, the Room Types and the Price lists which you want to be connected to the restrictions. Then, you choose which type of restriction you want to apply, the days and click '''Set Restriction'''. | ||
| + | |||
| + | [[File:setrestr1.png|800px|]] | ||
| + | |||
| + | === Option 2 === | ||
| + | You can also create a '''Special calendar''', connect it to your price list and update your channel’s contract by following these steps: | ||
| + | |||
| + | 1) From '''Options > Settings > Pricing policy > Special Calendars''' you create a '''New special calendar'''. | ||
| + | |||
| + | [[File:specialcal1.png|800px|]] | ||
| + | |||
| + | There you need to feel the basic data for the calendar Date, Type ( Restrictions calendar) and click '''Save'''. Then you need to go to the tab '''Calendar'''. | ||
| + | |||
| + | [[File:specialcal2.png|800px|]] | ||
| + | |||
| + | Here, you are able to set the restriction by using '''Tools 1 & 2'''. | ||
| + | |||
| + | [[File:specialcal3.png|800px|]] | ||
| + | |||
| + | '''Tool 1''' is for setting monthly restrictions and for selecting “Everything” and “Remaining dates”. You are able to select the month, the dates, and click '''Se'''t. | ||
| + | |||
| + | [[File:tools1.png|800px|]] | ||
| + | |||
| + | [[File:specialcaleveryr.png|800px|]] | ||
| + | |||
| + | '''Tool 2''' is for setting restrictions for custom dates and days of the week. You select the dates, days, restrictions and click '''Set'''. | ||
| + | |||
| + | [[File:tools2.png|800px|]] | ||
| + | |||
| + | 2) Now you need to connect your New special calendar with the price list. From '''Settings > Pricing policy > Price list''' you find the price list connected to the channel and you click on it. Under the tab '''Restrictions''' you create a '''New restriction''' by filling the sections Title, Restriction type, selecting the '''Special calendar''' you created in the previous step, the Price lists and Room types and you press '''Save'''. | ||
| + | |||
| + | [[File:picelistspecialcal.png|800px|]] | ||
| + | |||
| + | 3) In the last step, you need to go to '''Options > Settings > Booking agencies > Contracts''', find the specific channel contract and open it. Go to the tab Restrictions and click '''Upload'''. | ||
| + | |||
| + | [[File:uploadrestr.png|800px|]] | ||
== Stop/ Open Sales == | == Stop/ Open Sales == | ||
Revision as of 14:06, 6 September 2021
Contents
General Information
Booking.com is a world-known OTA that supports one-way and two-way connections. The connection and certification with hoteliga was completed in December 2014. There is also the concept of "Open extranet".
Change Prices and/or Availability
Single day by day price list
Set prices
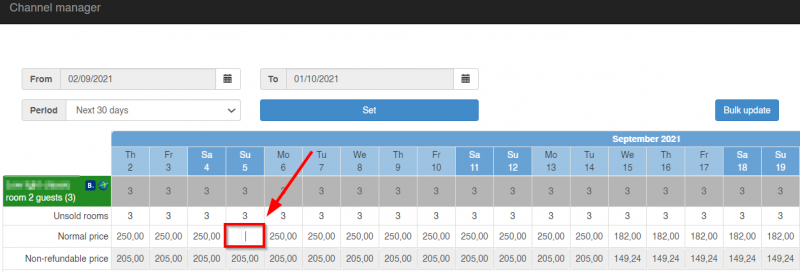
If you are using one single day by day price list you can set prices: From Options > Channel Manager > Calendar
There, you can simply click on a rate and type the price you want for that day.
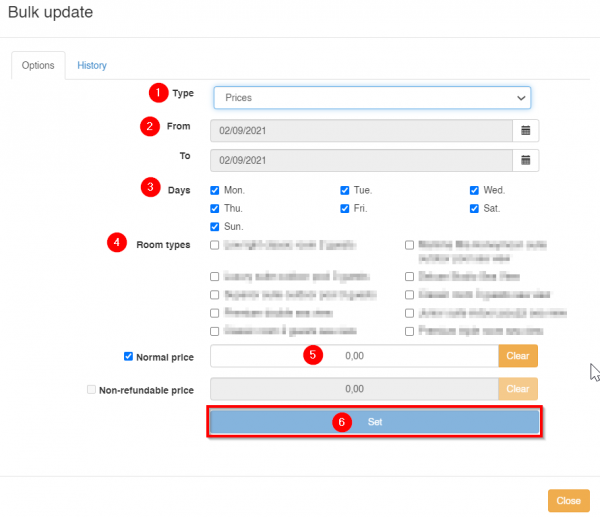
For bulk price changes you have the option to click on the Bulk update button.
The pop-up window contains a menu of commands where you can select the Type: Prices, the dates, the days of the week, the room types and finally the normal price.
Note: In case your non-refundable rates are linked to the normal price this section will be gray.
Set availability
Since you are using one single day by day price list you can set the availability from Options > Channel Manager > Calendar. There, you can simply click on a date and type the number of rooms you want to be available for that day.
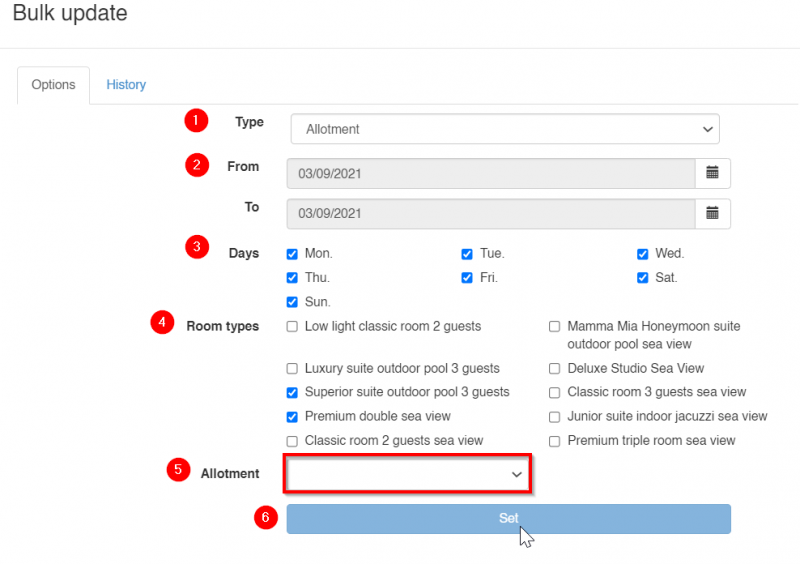
For bulk price changes you have the option to click on the Bulk update button.
The pop-up window contains a menu of commands where you can select the Type: Allotment, the Dates, the Days of the week, the Room types, set the Allotment number and finally click Set.
Multiple day by day price lists or Season-based price list
Set prices
In the case you are using multiple day by day price lists or you have a season-based price list then in order to set prices you need to:
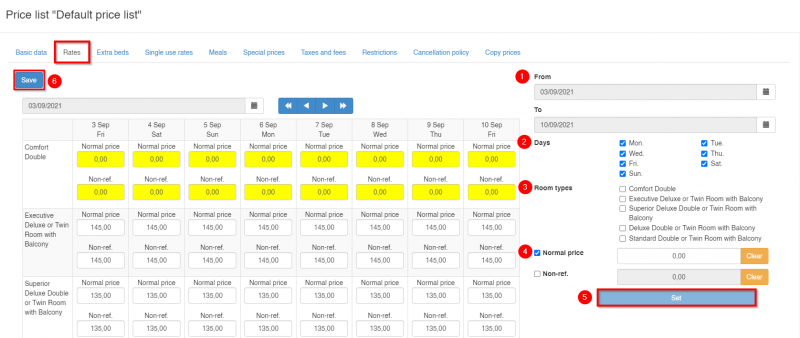
1. First go to Options > Settings > Pricing Policy > Price lists. There you will be able to select the Dates, the Days, the Room types and set the Normal Price and the Non-refundable rates, if applicable. Then click Set.
Similarly, you can set the Extra Bed charges and the Single use rates.
Note: If you would like to set the same prices for the same period in the following years you can always use the Copy prices tab, inside the Price lists window.
2. Secondly, you need to go to Options > Settings > Booking Agencies > Contracts
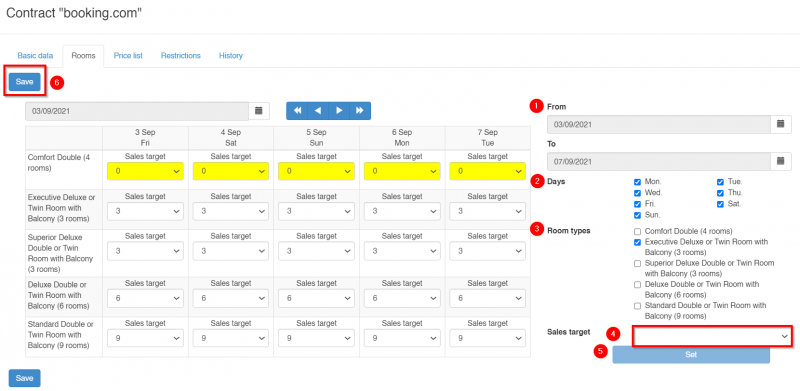
There you need to update the target sales for each room type for the period that you set the prices in the previous step.
Then you need to go to the tab Price list and click on the Upload button.
If any Restrictions apply you Upload them too.
And you are all set!
Set availability
In the case you are using multiple day by day price lists or you have a season-based price list you go to Options > Tools > Booking agencies > Contracts at the tab Rooms and update the target sales for each room type.
And Save.
Set Restrictions
In order to set restrictions you have multiple options.
Option 1
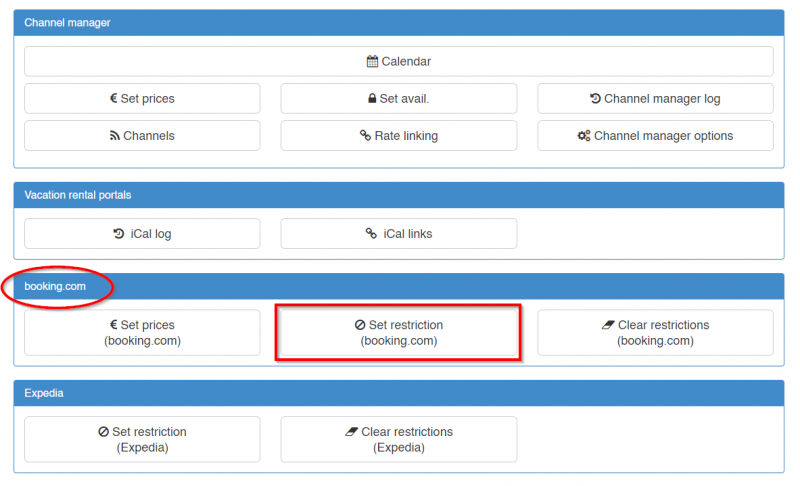
You can go to Options > Channel Manager > Booking.com and Select Set Restrictions.
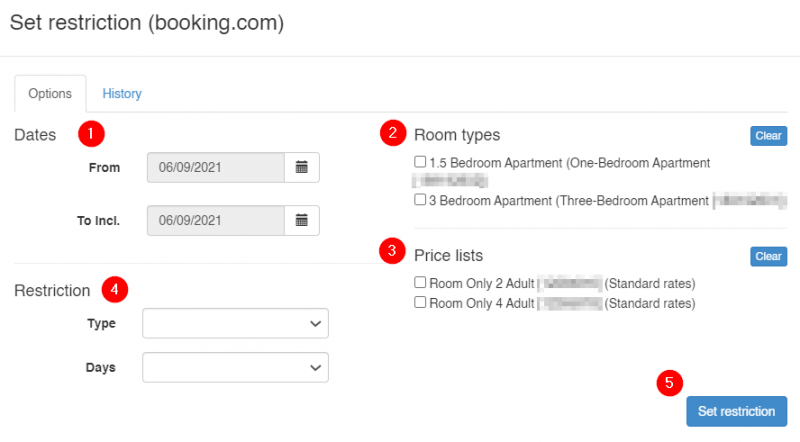
In the pop-up window you select the dates, the Room Types and the Price lists which you want to be connected to the restrictions. Then, you choose which type of restriction you want to apply, the days and click Set Restriction.
Option 2
You can also create a Special calendar, connect it to your price list and update your channel’s contract by following these steps:
1) From Options > Settings > Pricing policy > Special Calendars you create a New special calendar.
There you need to feel the basic data for the calendar Date, Type ( Restrictions calendar) and click Save. Then you need to go to the tab Calendar.
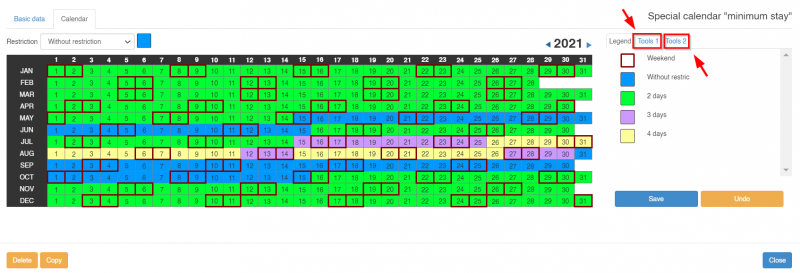
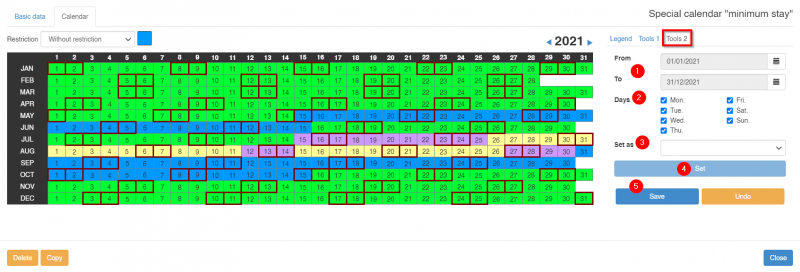
Here, you are able to set the restriction by using Tools 1 & 2.
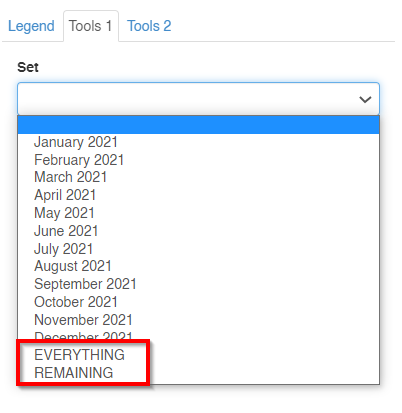
Tool 1 is for setting monthly restrictions and for selecting “Everything” and “Remaining dates”. You are able to select the month, the dates, and click Set.
Tool 2 is for setting restrictions for custom dates and days of the week. You select the dates, days, restrictions and click Set.
2) Now you need to connect your New special calendar with the price list. From Settings > Pricing policy > Price list you find the price list connected to the channel and you click on it. Under the tab Restrictions you create a New restriction by filling the sections Title, Restriction type, selecting the Special calendar you created in the previous step, the Price lists and Room types and you press Save.
3) In the last step, you need to go to Options > Settings > Booking agencies > Contracts, find the specific channel contract and open it. Go to the tab Restrictions and click Upload.
Stop/ Open Sales
Stop Sales
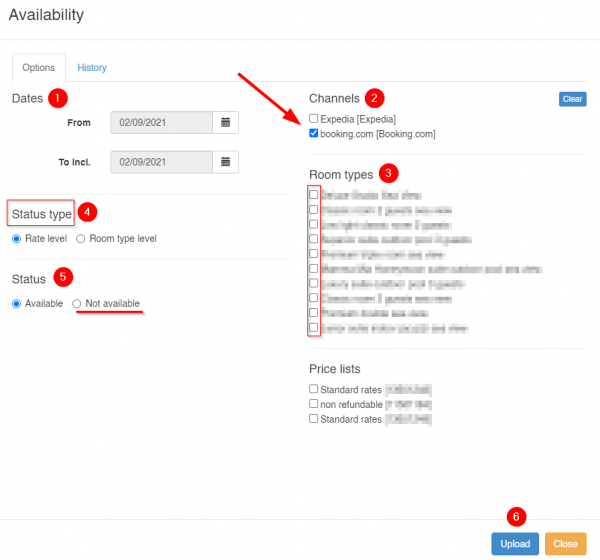
In order to Stop Sales in Channel Manager you need to go to Options > Channel Manager > Set Avail.
At the pop up window you need to define the Dates, select the Channel and the Room Types.
Then, if you would like to stop all sales you select Status Type - Room type level, Status - Not available and Upload.
If you would like to stop sales for a specific Price list then you select Status Type - Rate level, choose the Price list you want to stop sales for, Status - Not available and Upload.
Note: It is advisable to follow this process separately for its channel. The reason for this is that by selecting multiple channels at once only their common Room Types will be shown to you.
Open Sales
In order to open sales, you follow the same steps, described above, only that this time you select Available under the section Status and click Upload.

