Difference between revisions of "Invoicing"
| (231 intermediate revisions by 2 users not shown) | |||
| Line 1: | Line 1: | ||
| − | + | Invoicing the customers through hoteliga can be fast and simple. | |
| − | Before | + | Before invoicing (5), the respective parameters (1-4) should be set. |
| − | == ''' | + | == '''Setting the tax rates''' == |
| − | + | First of all, the tax rates should be inserted in the system. | |
| − | + | Depending on the country and/or city, different tax rates may apply. | |
| + | <pre style="color: red">Before issuing invoices and receipts, it is suggested that the accountant has provided his confirmation that all the rates entered in the system are correct.</pre> | ||
| − | + | The steps to set a new tax are: | |
| − | + | '''Options'''⇒ '''Settings'''⇒ '''Invoicing'''⇒ '''Taxes'''⇒ '''New tax''' | |
| − | + | The fields should be filled in according to the directions below: | |
| − | |||
| − | + | [[File:inv_new_tax_1.png]] | |
| − | |||
| − | |||
| − | |||
| − | |||
| − | + | '''1. Title''': The title of the tax, as it will be mentioned on the invoice/receipt. | |
| − | + | '''2. Tax type''': The country/state that the taxes are paid to. | |
| − | + | '''3. Information''': This link provides information related to the tax selected in the "tax type". The information is <u>indicative</u>. | |
| − | ''' | ||
| − | + | '''4. Percentage:''' The number of the tax rate should by filled in. E.g. if the tax rate is 10%, number "10" should be typed in this field. | |
| − | |||
| − | |||
| − | |||
| − | |||
| − | |||
| − | + | == '''Setting the counters''' == | |
| + | The invoice and receipt counters can be set and managed as described below. | ||
| − | + | Depending on the needs, the system can register as many counters as needed. | |
| − | |||
| − | - | + | The steps to set a new counter are: |
| − | ''' | + | |
| + | '''Options'''⇒ '''Settings'''⇒ '''Invoicing'''⇒ '''Counters'''⇒ '''New counter''' | ||
| + | |||
| + | The fields should be filled in according to the directions below: | ||
| + | |||
| + | [[File:inv_new_counter_1a.png]] | ||
| + | [[File:inv_new_counter_2a.png]] | ||
| + | |||
| + | '''1. Title:''' This title is for internal use and will appear during invoice preview to make the selection of the counter easier (it will not be displayed on the invoice). | ||
| + | |||
| + | '''2. Type:''' Defines the type of the counter, e.g. invoice, receipt, credit invoice etc. | ||
| + | |||
| + | '''3. Initial value:''' A starting number for the invoices should be defined. If another system has already been used for invoicing and the last invoice was e.g. 515, the next value can be registered, e.g. 516. Otherwise, 1 or 1001 or something similar can be registered. | ||
| + | |||
| + | '''4. Next value:''' This is an informative and read-only field to show what will be the next value of the counter. | ||
| + | |||
| + | '''5. Format:''' A specific format can be provided to the numbering. Letters or numbers can be placed, before or after the numbering, and the symbols # can be used to define the length and the position of the numbering. For example, if the invoices should have a numbering like A101, A102, etc., "A###" should be placed here. If the required format is like 1001/2016, 1002/2016, etc., "####/2016" should be defined as a format. The final format is available at the invoice preview. | ||
| + | |||
| + | '''6. Enabled:''' An enabled counter appears in the list of counters at the invoice preview, while a disabled not. | ||
| + | |||
| + | '''7. Ok:''' Saves the registration. | ||
| + | |||
| + | == '''Enabling taxes in price lists''' == | ||
| + | Enabling the taxes in price lists is necessary before invoicing. | ||
| + | |||
| + | Following the steps '''Options'''⇒ '''Settings'''⇒ '''Pricing policy'''⇒ '''Price lists''' and clicking on the price list name, the following screen is available by clicking on the tab '''"Taxes"'''. | ||
| + | |||
| + | [[File:inv_pricelist_tax_en.png]] | ||
| + | |||
| + | '''Enabled:''' When clicked, tax is enabled. | ||
| + | |||
| + | '''Included:''' When clicked, tax is included. | ||
| + | |||
| + | == '''Customizing the invoice templates''' == | ||
| + | Templates can be used in invoicing. A list of them is available following these steps: '''Options'''⇒ '''Settings'''⇒ '''Templates''' | ||
| + | |||
| + | [[File:inv_template_list_en.png]] | ||
| + | |||
| + | In this list, there are several templates for invoices and receipts in many languages. Using the filters ('''"Show filter"''' button), the appropriate template can be found and open for editing by clicking on it. | ||
| + | |||
| + | |||
| + | [[File:inv_template_1a.png]] | ||
| + | |||
| + | '''1. Title:''' It can be renamed if it is required. | ||
| + | |||
| + | '''2. Template Type:''' It is set by default. | ||
| + | |||
| + | '''3. Language:''' It is set by default. | ||
| + | |||
| + | '''4. Subject:''' N/A in invoicing. | ||
| + | |||
| + | '''5. Content:''' The content can be available for editing in a larger view, by clicking on the '''"full screen"''' button '''(6)'''. | ||
| + | |||
| + | |||
| + | [[File:inv_template_2_en.png]] | ||
| + | |||
| + | '''" 1 & 2 "''': The logo and the billing information (address, VAT or TAX ID number, contact info etc.) of the hotel must be included in these fields. | ||
| + | |||
| + | |||
| + | <u>'''Note:'''</u> | ||
| + | |||
| + | A new template can be created, following the steps: '''Options'''⇒ '''Settings'''⇒ '''Templates'''⇒ '''New template'''. The fields should be filled in as per above. | ||
| + | |||
| + | == '''How to invoice''' == | ||
| + | |||
| + | |||
| + | ==='''Final invoice'''=== | ||
| + | |||
| + | If only one invoice should be issued for the whole amount of the reservation to a customer, it can be easily done by clicking the ''''Final invoice'''' button in the reservation form. | ||
| + | |||
| + | [[File:inv_res_invoice.png]] | ||
| + | |||
| + | Then, the steps below should be followed: | ||
| + | |||
| + | [[File:inv final step en.png]] | ||
| + | |||
| + | '''1. Template:''' Defines the invoice/receipt template. | ||
| + | |||
| + | '''2. Counter:''' Defines the counter. | ||
| + | |||
| + | '''3. Issue:''' Issues the invoice. | ||
| + | |||
| + | Issued invoices can be seen on screen, printed on printer and exported in pdf or excel. | ||
| + | |||
| + | ==='''Reservations invoicing'''=== | ||
| + | Customers, booking agencies and companies can be invoiced, using the ''''Reservations invoicing'''' tool. | ||
| + | |||
| + | It is also used in cases that more than one invoice should be issued, e.g. in case that the total amount has to split per customer in separate invoices. | ||
| + | |||
| + | |||
| + | The tool is available at: '''Options⇒ Tools ⇒ Invoicing⇒ Reservations invoicing''' | ||
| + | |||
| + | [[File:inv_res_invoicing_form_en.png]] | ||
| + | |||
| + | '''1. Type:''' Filters the reservations according to the arrival or departure date. | ||
| + | |||
| + | '''2. From:''' Defines the first day of the selected time period. | ||
| + | |||
| + | '''3. To:''' Defines the last day of the selected timer period. | ||
| + | |||
| + | '''4. Agency:''' Defines the agency, if it is required. | ||
| + | |||
| + | '''5. Filter:''' Shows the results. | ||
| + | |||
| + | '''6. Reset:''' Clears the filters. | ||
| + | |||
| + | '''7. Invoicing:''' Click to go to the next step. | ||
| + | |||
| + | |||
| + | [[File:inv_res_step_1a.png]] | ||
| + | |||
| + | '''1. Invoice language: ''' Defines the language. | ||
| + | |||
| + | '''2. Select who will be invoiced:''' Selection according to the case. | ||
| + | |||
| + | '''5. Next step:''' Click to go to the next step. | ||
| + | |||
| + | |||
| + | The charges can be defined at the next step. | ||
| + | |||
| + | [[File:Inv res step 2 en.png]] | ||
| + | |||
| + | '''1. Quantity:''' It can be changed, selecting a number from the drop-down list. | ||
| + | |||
| + | '''2. Description:''' As it will be displayed on the invoice. | ||
| + | |||
| + | '''3. Unit price:''' As it is set in the reservation. | ||
| + | |||
| + | '''4. Total:''' This is related to the selected quantity. | ||
| + | |||
| + | '''5. Next step:''' Click to go to the next step. | ||
| − | |||
| − | |||
| − | |||
| − | |||
| − | + | [[File:Inv res step 3a.png]] | |
| − | |||
| − | |||
| − | |||
| − | + | '''1. Template:''' The appropriate template should be selected from the drop-down list. | |
| − | + | '''2. Counter:''' The appropriate counter should be selected from drop-down list. | |
| − | |||
| − | |||
| − | |||
| − | |||
| − | |||
| − | |||
| − | |||
| − | + | '''3. Issue: ''' Click to invoice. | |
| − | + | Issued invoices can be seen on screen, printed on printer and exported in pdf or excel. | |
| − | + | The invoice is ready! | |
| − | + | == Reports == | |
| + | There are several reports related to the issued invoices, in the respective part of the reports section: '''Options⇒ Reports⇒ Invoicing''' | ||
| + | The available reports are the following: | ||
| − | |||
| − | + | '''20 Invoices/receipts for period by counter:''' Depending on the selected period, the report includes the invoices/receipts by counter. | |
| − | |||
| − | |||
| − | |||
| − | + | '''21 Invoices/receipts for period by counter (tax breakdown):''' Depending on the selected period, the report includes not only the invoices/receipts by counter, but also the tax breakdown. | |
| − | [[File: | + | '''19 Reservation invoice/receipt:''' If an invoice must be reprinted, it can be done by using this report. The invoice can be found by selecting the counter and typing the number of the invoice. |
| + | |||
| + | '''40 Uninvoiced reservations by booking agency and arrival date for period:''' Depending on the selected arrival dates, a list of uninvoiced reservations is provided. | ||
| + | |||
| + | '''41 Uninvoiced reservations by booking agency and departure date for period:''' Depending on the selected departure dates, a list of uninvoiced reservations is provided. | ||
| + | |||
| + | == Billing info agency == | ||
| + | The billing information of an agency can be added by creating a new customer. | ||
| + | |||
| + | It can be done following the steps: | ||
| + | |||
| + | '''Options⇒ Customers⇒ New customer''' | ||
| + | |||
| + | [[File:cus_new_ba_1_en.png]] | ||
| + | |||
| + | '''1. First name: ''' The name of the agency/company to be invoiced. | ||
| + | |||
| + | All the other fields should not be filled in. | ||
| + | |||
| + | |||
| + | [[File:cus_new_ba_2_en.png]] | ||
| + | |||
| + | '''1. - 7. :''' The billing info of the booking agency/company. | ||
| + | |||
| + | |||
| + | |||
| + | After the customer is created, it must be connected to the booking agency. | ||
| + | It can be done by following the steps: '''Options⇒ Settings⇒ Booking agencies''' | ||
| + | |||
| + | [[File:inv_ba_billing_info_en.png]] | ||
| + | |||
| + | '''1. Customer:''' The name of the agency can be found in this list by typing the first letters of its name. | ||
| + | |||
| + | '''2. Cooperation type:''' In this case, ‘the agency pays for the reservation’ is the correct selection. | ||
| − | + | and the entry is saved by clicking on '''save'''. | |
Latest revision as of 15:14, 28 January 2020
Invoicing the customers through hoteliga can be fast and simple.
Before invoicing (5), the respective parameters (1-4) should be set.
Contents
Setting the tax rates
First of all, the tax rates should be inserted in the system.
Depending on the country and/or city, different tax rates may apply.
Before issuing invoices and receipts, it is suggested that the accountant has provided his confirmation that all the rates entered in the system are correct.
The steps to set a new tax are:
Options⇒ Settings⇒ Invoicing⇒ Taxes⇒ New tax
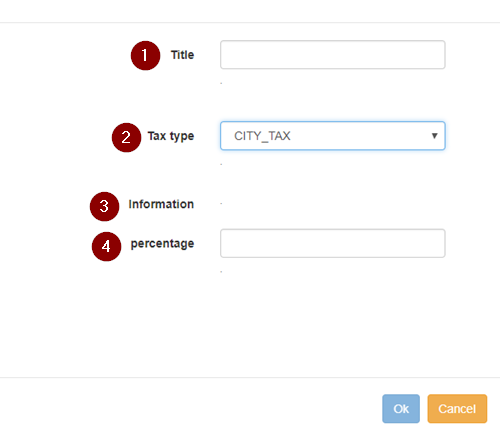
The fields should be filled in according to the directions below:
1. Title: The title of the tax, as it will be mentioned on the invoice/receipt.
2. Tax type: The country/state that the taxes are paid to.
3. Information: This link provides information related to the tax selected in the "tax type". The information is indicative.
4. Percentage: The number of the tax rate should by filled in. E.g. if the tax rate is 10%, number "10" should be typed in this field.
Setting the counters
The invoice and receipt counters can be set and managed as described below.
Depending on the needs, the system can register as many counters as needed.
The steps to set a new counter are:
Options⇒ Settings⇒ Invoicing⇒ Counters⇒ New counter
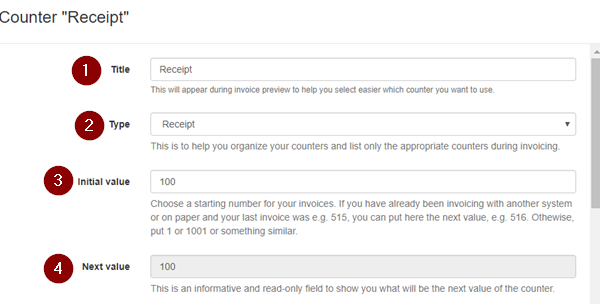
The fields should be filled in according to the directions below:
1. Title: This title is for internal use and will appear during invoice preview to make the selection of the counter easier (it will not be displayed on the invoice).
2. Type: Defines the type of the counter, e.g. invoice, receipt, credit invoice etc.
3. Initial value: A starting number for the invoices should be defined. If another system has already been used for invoicing and the last invoice was e.g. 515, the next value can be registered, e.g. 516. Otherwise, 1 or 1001 or something similar can be registered.
4. Next value: This is an informative and read-only field to show what will be the next value of the counter.
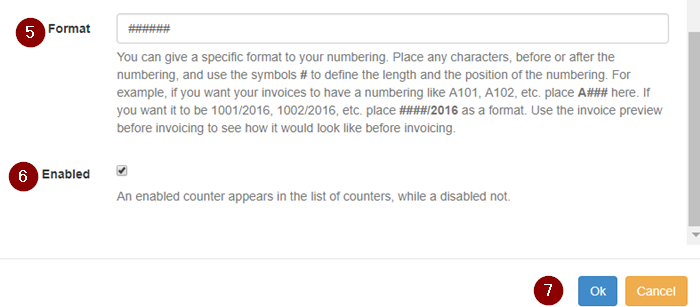
5. Format: A specific format can be provided to the numbering. Letters or numbers can be placed, before or after the numbering, and the symbols # can be used to define the length and the position of the numbering. For example, if the invoices should have a numbering like A101, A102, etc., "A###" should be placed here. If the required format is like 1001/2016, 1002/2016, etc., "####/2016" should be defined as a format. The final format is available at the invoice preview.
6. Enabled: An enabled counter appears in the list of counters at the invoice preview, while a disabled not.
7. Ok: Saves the registration.
Enabling taxes in price lists
Enabling the taxes in price lists is necessary before invoicing.
Following the steps Options⇒ Settings⇒ Pricing policy⇒ Price lists and clicking on the price list name, the following screen is available by clicking on the tab "Taxes".
Enabled: When clicked, tax is enabled.
Included: When clicked, tax is included.
Customizing the invoice templates
Templates can be used in invoicing. A list of them is available following these steps: Options⇒ Settings⇒ Templates
In this list, there are several templates for invoices and receipts in many languages. Using the filters ("Show filter" button), the appropriate template can be found and open for editing by clicking on it.
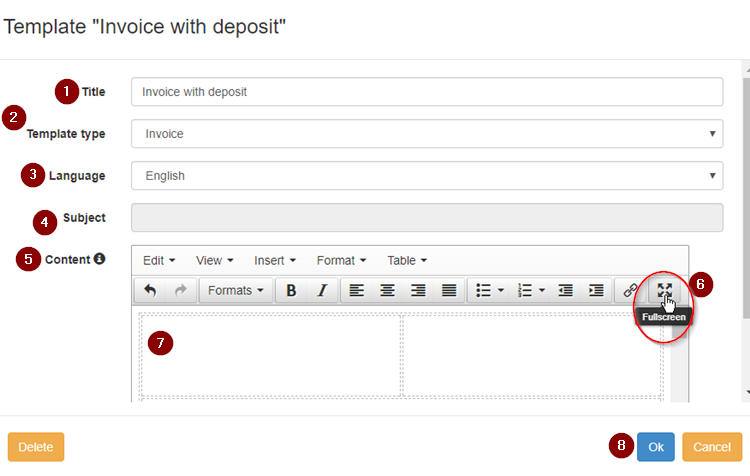
1. Title: It can be renamed if it is required.
2. Template Type: It is set by default.
3. Language: It is set by default.
4. Subject: N/A in invoicing.
5. Content: The content can be available for editing in a larger view, by clicking on the "full screen" button (6).
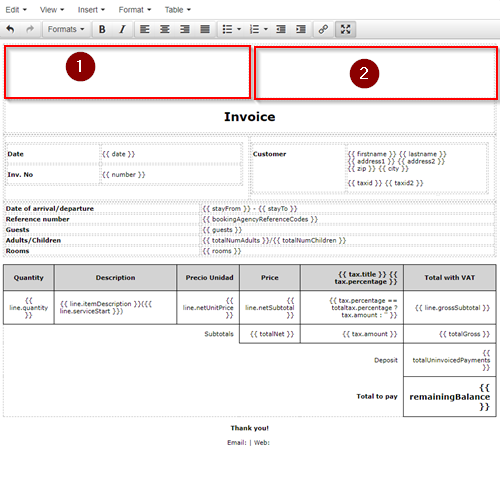
" 1 & 2 ": The logo and the billing information (address, VAT or TAX ID number, contact info etc.) of the hotel must be included in these fields.
Note:
A new template can be created, following the steps: Options⇒ Settings⇒ Templates⇒ New template. The fields should be filled in as per above.
How to invoice
Final invoice
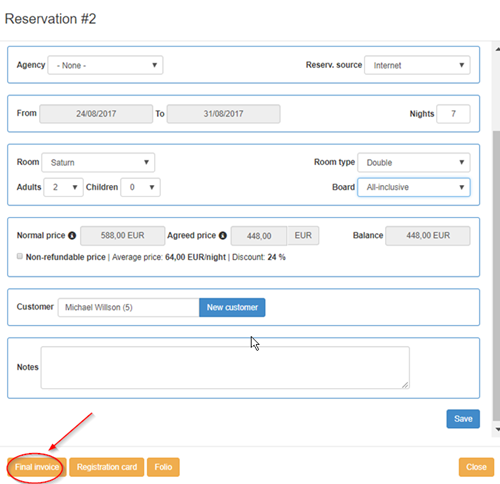
If only one invoice should be issued for the whole amount of the reservation to a customer, it can be easily done by clicking the 'Final invoice' button in the reservation form.
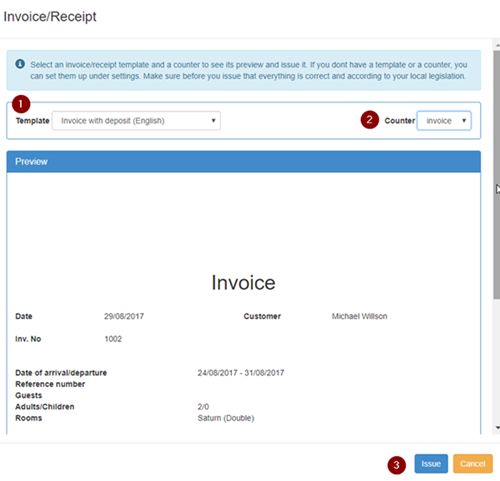
Then, the steps below should be followed:
1. Template: Defines the invoice/receipt template.
2. Counter: Defines the counter.
3. Issue: Issues the invoice.
Issued invoices can be seen on screen, printed on printer and exported in pdf or excel.
Reservations invoicing
Customers, booking agencies and companies can be invoiced, using the 'Reservations invoicing' tool.
It is also used in cases that more than one invoice should be issued, e.g. in case that the total amount has to split per customer in separate invoices.
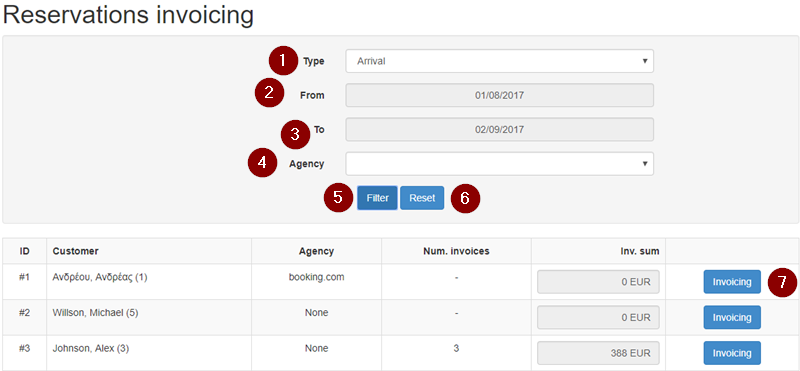
The tool is available at: Options⇒ Tools ⇒ Invoicing⇒ Reservations invoicing
1. Type: Filters the reservations according to the arrival or departure date.
2. From: Defines the first day of the selected time period.
3. To: Defines the last day of the selected timer period.
4. Agency: Defines the agency, if it is required.
5. Filter: Shows the results.
6. Reset: Clears the filters.
7. Invoicing: Click to go to the next step.
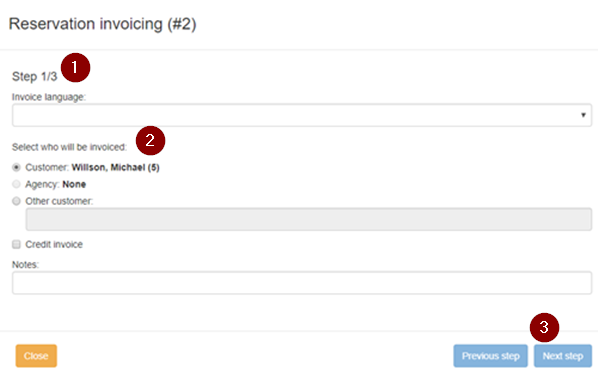
1. Invoice language: Defines the language.
2. Select who will be invoiced: Selection according to the case.
5. Next step: Click to go to the next step.
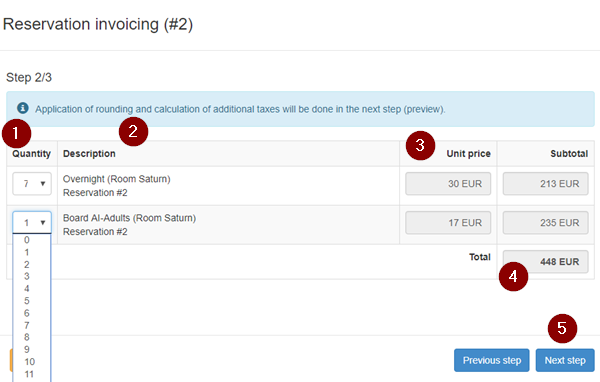
The charges can be defined at the next step.
1. Quantity: It can be changed, selecting a number from the drop-down list.
2. Description: As it will be displayed on the invoice.
3. Unit price: As it is set in the reservation.
4. Total: This is related to the selected quantity.
5. Next step: Click to go to the next step.
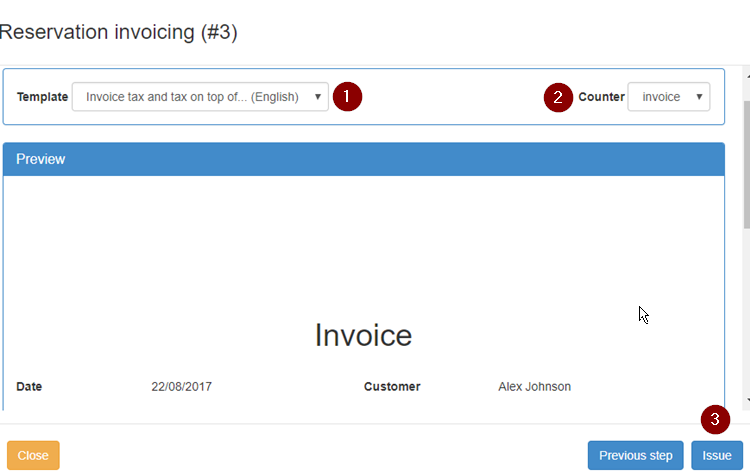
1. Template: The appropriate template should be selected from the drop-down list.
2. Counter: The appropriate counter should be selected from drop-down list.
3. Issue: Click to invoice.
Issued invoices can be seen on screen, printed on printer and exported in pdf or excel.
The invoice is ready!
Reports
There are several reports related to the issued invoices, in the respective part of the reports section: Options⇒ Reports⇒ Invoicing
The available reports are the following:
20 Invoices/receipts for period by counter: Depending on the selected period, the report includes the invoices/receipts by counter.
21 Invoices/receipts for period by counter (tax breakdown): Depending on the selected period, the report includes not only the invoices/receipts by counter, but also the tax breakdown.
19 Reservation invoice/receipt: If an invoice must be reprinted, it can be done by using this report. The invoice can be found by selecting the counter and typing the number of the invoice.
40 Uninvoiced reservations by booking agency and arrival date for period: Depending on the selected arrival dates, a list of uninvoiced reservations is provided.
41 Uninvoiced reservations by booking agency and departure date for period: Depending on the selected departure dates, a list of uninvoiced reservations is provided.
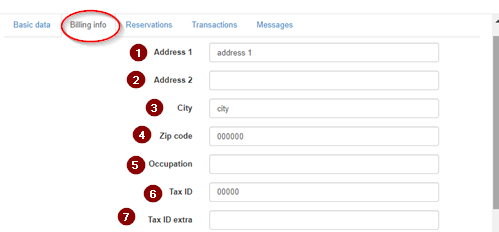
Billing info agency
The billing information of an agency can be added by creating a new customer.
It can be done following the steps:
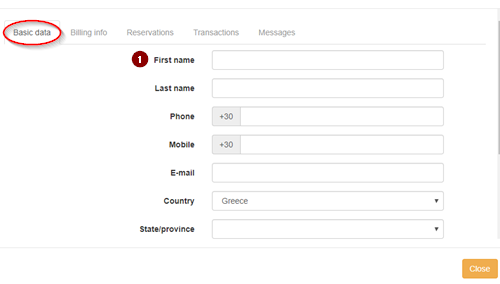
Options⇒ Customers⇒ New customer
1. First name: The name of the agency/company to be invoiced.
All the other fields should not be filled in.
1. - 7. : The billing info of the booking agency/company.
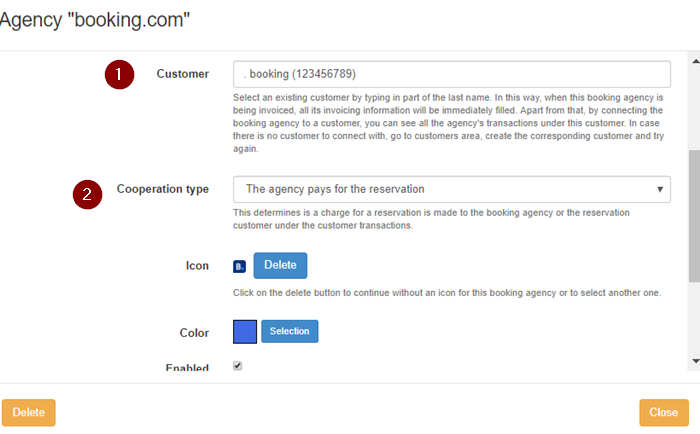
After the customer is created, it must be connected to the booking agency. It can be done by following the steps: Options⇒ Settings⇒ Booking agencies
1. Customer: The name of the agency can be found in this list by typing the first letters of its name.
2. Cooperation type: In this case, ‘the agency pays for the reservation’ is the correct selection.
and the entry is saved by clicking on save.
