Difference between revisions of "Booking agency Setup"
From hoteliga
(→Create a new Booking agency) |
(→Contracts) |
||
| (One intermediate revision by the same user not shown) | |||
| Line 18: | Line 18: | ||
#Start typing the name of the customer that you have created for this agency. This way when this booking agency is being invoiced, all its invoicing information will be immediately filled. Apart from that, by connecting the booking agency to a customer, you can see all the agency's transactions under this customer. Click here for more information on how to [[Customer_Management#Create_a_new_customer|create a new customer]] in the name of the agency. | #Start typing the name of the customer that you have created for this agency. This way when this booking agency is being invoiced, all its invoicing information will be immediately filled. Apart from that, by connecting the booking agency to a customer, you can see all the agency's transactions under this customer. Click here for more information on how to [[Customer_Management#Create_a_new_customer|create a new customer]] in the name of the agency. | ||
#Chose the right option from the list | #Chose the right option from the list | ||
| − | #You can upload an icon for this agency | + | #You can upload an icon for this agency (for OTAs you do not need to upload one) |
#You can select the color that this agency's reservations will have on your [[The Reservations Calendar|calendar]] | #You can select the color that this agency's reservations will have on your [[The Reservations Calendar|calendar]] | ||
#Select '''Enabled''' to enable the booking agency. | #Select '''Enabled''' to enable the booking agency. | ||
| Line 32: | Line 32: | ||
*Click OK. | *Click OK. | ||
| − | == | + | ==Contracts== |
| − | + | Click [[Contracts|here]] to see more information about contracts | |
| − | |||
| − | |||
| − | |||
| − | |||
| − | |||
| − | |||
| − | |||
| − | |||
| − | |||
| − | |||
| − | |||
| − | |||
| − | |||
| − | |||
| − | |||
| − | |||
Latest revision as of 12:09, 22 February 2024
Create a new Booking agency
To create a new listing for a Booking agency, go to Options ⇒ Settings ⇒ Booking agencies.
Click the button New booking agency.
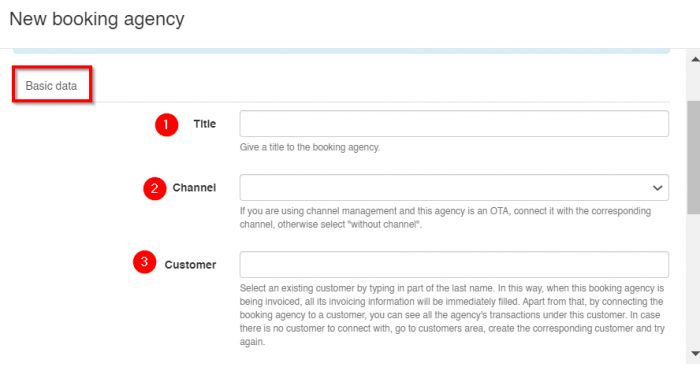
Inside the form you fill in the form as shown below:
- Type the title or name of the booking agency (for example booking.com, TUI etc.).
- If you are using channel management and this agency is an OTA, connect it with the corresponding channel, otherwise select "without channel".
- Start typing the name of the customer that you have created for this agency. This way when this booking agency is being invoiced, all its invoicing information will be immediately filled. Apart from that, by connecting the booking agency to a customer, you can see all the agency's transactions under this customer. Click here for more information on how to create a new customer in the name of the agency.
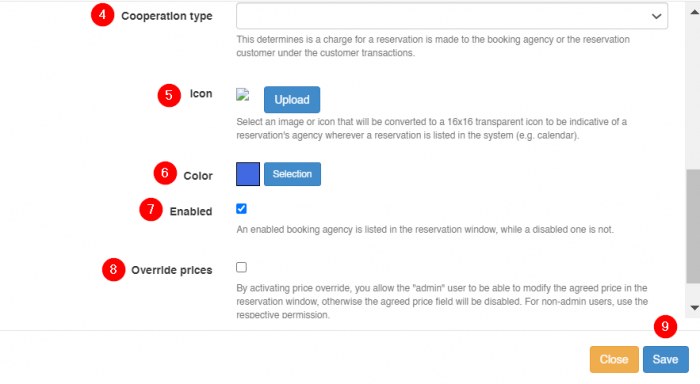
- Chose the right option from the list
- You can upload an icon for this agency (for OTAs you do not need to upload one)
- You can select the color that this agency's reservations will have on your calendar
- Select Enabled to enable the booking agency.
- Select Override prices if you want to be able to override prices within the reservation. To be able to Overide prices for a booking agency, you have to enable it here and also have this option enabled in user permissions.
- Click OK.
Disable a booking agency
To disable a listing for a Booking agency, go to Options ⇒ Settings ⇒ Booking agencies.
- Click on the booking agency that you want to disable.
- Uncheck 'Enabled'.
- Click OK.
Contracts
Click here to see more information about contracts

