Difference between revisions of "Invoicing"
(→a. Creating a template using an existing one) |
(→How to invoice) |
||
| Line 120: | Line 120: | ||
==='''Fast invoicing'''=== | ==='''Fast invoicing'''=== | ||
| − | If | + | If only one invoice should be issued for the whole amount of the reservation to a customer, it can be easily done by clicking the 'Invoice/Receipt' button in the reservation form. |
| − | + | Then, the steps below should be followed: | |
| − | Then | ||
[[File:invoice_receipt.png]] | [[File:invoice_receipt.png]] | ||
| Line 129: | Line 128: | ||
==='''Reservations invoicing'''=== | ==='''Reservations invoicing'''=== | ||
| − | + | Customers, booking agencies and companies can be invoiced, using the 'Reservations invoicing' tool. It is also used in cases that, more than one invoice should be issued. | |
| − | |||
| − | + | For example, if the amounts should be split per customer in separate invoices, this is applicable using the 'Reservations invoicing' tool. | |
| − | ' | ||
| + | The respective form is available, by following the steps below: | ||
| + | '''Options⇒ Tools ⇒ Invoicing⇒ Reservations invoicing.''' | ||
[[File:reserv_inv.png]] | [[File:reserv_inv.png]] | ||
| Line 144: | Line 143: | ||
[[File:inv_res_step_1a.png]] | [[File:inv_res_step_1a.png]] | ||
| − | '''1. language''' | + | '''1. language: ''' The language of the invoice should be defined here. |
| − | '''2. who will be invoiced:''' | + | '''2. who will be invoiced:''' According to this selection the existing customer, the agency or a new customer can be invoiced. |
| − | '''3. credit invoice:''' | + | '''3. credit invoice:'''If this is credit invoice that should be issued, then this box should be checked. |
| − | '''4. notes:''' | + | '''4. notes:'''Any important notes that are filled in this field, will be shown on the invoice. |
| − | '''5. next step:''' | + | '''5. next step:''' By clicking this button, the next form will open. |
| − | At the next step, | + | At the next step, the system allows the charges to be defined. |
[[File:inv res step 2a.png]] | [[File:inv res step 2a.png]] | ||
| − | '''1. 1st line:''' in the first line | + | '''1. 1st line:''' in the first line there are the charges of the accommodation. The number of nights selected in this line, are those that should be charged on the invoice. |
| − | '''2. 2nd line:''' in this line | + | '''2. 2nd line:''' in this line there are extra charges that have been set for this customer. The number of the refreshments selected in this line, is what will be charged on the invoice. |
Please note that this window could include as many lines as needed according to the reservation and the charges you have included in the reservation form. Also note, that if you have already issued invoice for part of the charges, these will not affect the total number of the quantity .e.g. if a customer has made a reservation for 6 nights and you have already invoiced the 3 of them, then the quantity you will see it will still be 6. | Please note that this window could include as many lines as needed according to the reservation and the charges you have included in the reservation form. Also note, that if you have already issued invoice for part of the charges, these will not affect the total number of the quantity .e.g. if a customer has made a reservation for 6 nights and you have already invoiced the 3 of them, then the quantity you will see it will still be 6. | ||
Revision as of 08:48, 28 August 2017
Invoicing the customers through hoteliga, can be simple and fast.
Before invoicing (5), the respective parameters (1-4) should be set.
Contents
Setting the tax rates
First of all, the tax rates should be inserted in the system.
Depending on the country and/or city, different tax rates may apply.
Make sure you confirm with your accountant that all rates entered in the system are correct before you start issuing invoices and receipts.
The steps to open a "new tax" form:
Options⇒ Settings⇒ Invoicing⇒ Taxes⇒ 'New tax' .
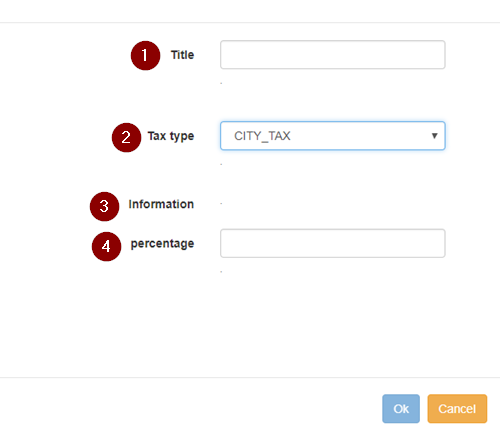
The fields should be filled in according to the directions below:
1. Title: The title of the tax, as it will be mentioned on the invoice/receipt.
2. Tax type: The country/state that the taxes are paid to.
3. Information: This link provides information on the tax selected in the "tax type".
4. Percentage: The number of the tax percentage should be filled in.
Setting the counters
The invoice and receipt counters can be set and managed as described in this section.
Depending on the hotel's needs, the system can register as many counters as needed.
The steps to open a "new counter" form:
Options⇒ Settings⇒ Invoicing⇒ Counters⇒ New counter
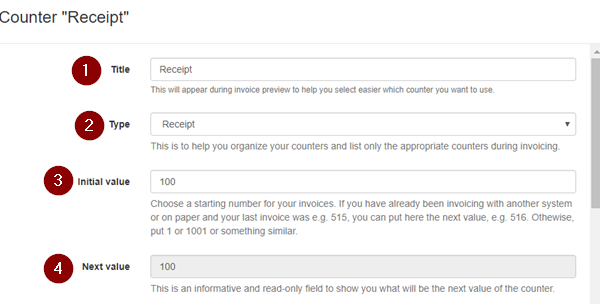
The fields should be filled in according to the directions below:
1. Title: This title will be appeared during invoice preview to make the selection of the counter easier.
2. Type: This can help the counters to remain organized during invoicing and keep listed only the appropriate counters.
3. Initial value: A starting number for the invoices should be defined. If another system has already been used for invoicing (even on paper) and the last invoice was e.g. 515, the next value can be registered, e.g. 516. Otherwise, 1 or 1001 or something similar can be registered.
4. Next value: This is an informative and read-only field to show what will be the next value of the counter.
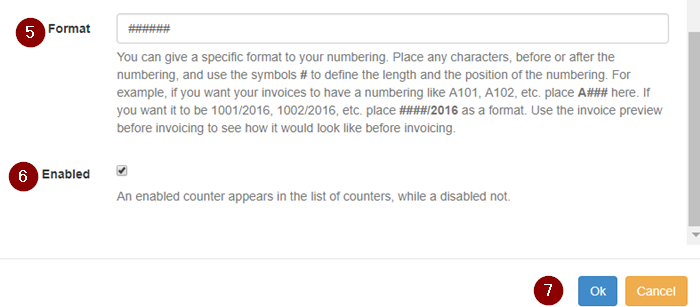
5. Format: A specific format can be provided to the numbering. Any characters can be placed, before or after the numbering, and the symbols # can be used to define the length and the position of the numbering. For example, if the invoices should have a numbering like A101, A102, etc., "A###" should be placed here. If the required format is like 1001/2016, 1002/2016, etc., "####/2016" should be defined as a format. The final format is available at the invoice preview before invoicing. This is how it will look like on the invoice.
6. Enabled: An enabled counter appears in the list of counters, while a disabled not.
7. ok: Saves the registration.
Matching the taxes to the price lists
Every price list used for invoicing, should be matched to the taxes that have already been set. This is the reason why the following steps are necessary before invoicing.
Options⇒ Settings⇒ Pricing policy⇒ Price lists and the respective price list should be selected.
Here can be defined which taxes are enabled (i.e. final prices are calculated with taxes) and which are included in prices. If there are not any taxes here, they can be defined under settings.
Enabled: This selection enable taxes for this price list.
Included: If taxes are include in prices this selections is necessary. Otherwise, the box should be left blank.
Customizing the invoicing documents
Templates are used for the configuration of the format of the invoicing documents. The number of templates that can be created, is related to the needs of the hotel.
The creation of a template can be done:
a. either by editing an existing one, or
b. by creating a new one.
a. Creating a template using an existing one
A list of templates can be found following the below steps:
Options⇒ Settings⇒ Templates
The appropriate template can be found using the filters, by clicking on "show filter"
The respective line should be selected and a new window will open.
Any amendments on the template will change the template itself. Thus, if a template should be used without affecting it, a new template should be created and then all the information of the template should be copied to the new one. (b. Creating a new template)
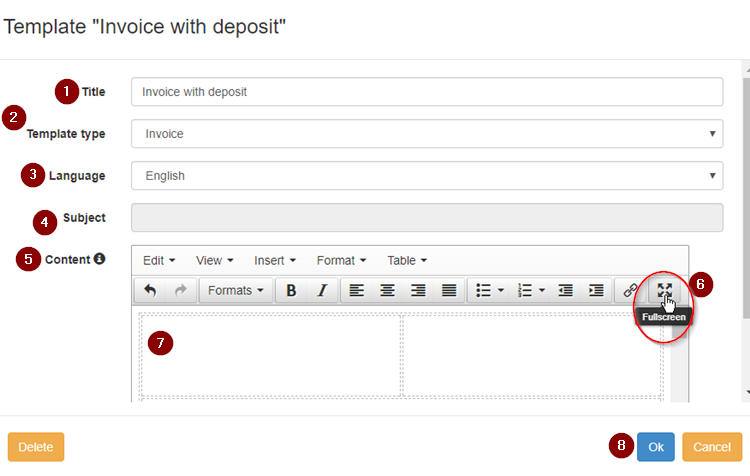
Title: The name should be adjusted according to the needs.
Template Type: This selection defines the type of the document (invoice, payment receipt, credit invoice etc.)
Language: It defines the displayed language.
Subject: It is available depending on the template type.
Content: This is the main body of the document that should include all the mandatory information. By clicking on "full screen" button, the content is available in a bigger scale.
b. Creating a new template
A new template can be created, following the steps: Options⇒ Settings⇒ Templates⇒ New template.
The new form should be completed exactly in the same way as in the previous section.(a. Creating a template using an existing one).
How to invoice
Fast invoicing
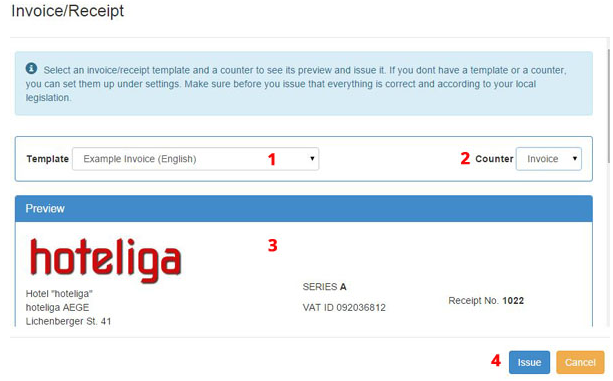
If only one invoice should be issued for the whole amount of the reservation to a customer, it can be easily done by clicking the 'Invoice/Receipt' button in the reservation form. Then, the steps below should be followed:
Reservations invoicing
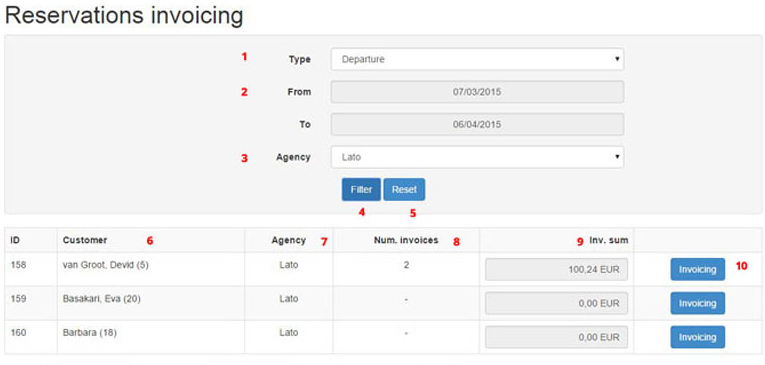
Customers, booking agencies and companies can be invoiced, using the 'Reservations invoicing' tool. It is also used in cases that, more than one invoice should be issued.
For example, if the amounts should be split per customer in separate invoices, this is applicable using the 'Reservations invoicing' tool.
The respective form is available, by following the steps below:
Options⇒ Tools ⇒ Invoicing⇒ Reservations invoicing.
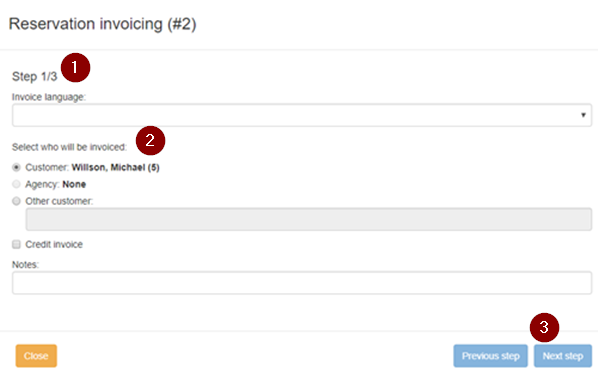
1. language: The language of the invoice should be defined here.
2. who will be invoiced: According to this selection the existing customer, the agency or a new customer can be invoiced.
3. credit invoice:If this is credit invoice that should be issued, then this box should be checked.
4. notes:Any important notes that are filled in this field, will be shown on the invoice.
5. next step: By clicking this button, the next form will open.
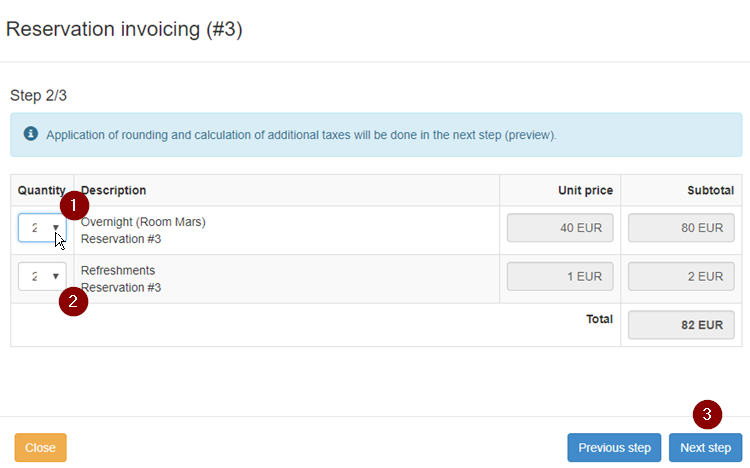
At the next step, the system allows the charges to be defined.
1. 1st line: in the first line there are the charges of the accommodation. The number of nights selected in this line, are those that should be charged on the invoice.
2. 2nd line: in this line there are extra charges that have been set for this customer. The number of the refreshments selected in this line, is what will be charged on the invoice.
Please note that this window could include as many lines as needed according to the reservation and the charges you have included in the reservation form. Also note, that if you have already issued invoice for part of the charges, these will not affect the total number of the quantity .e.g. if a customer has made a reservation for 6 nights and you have already invoiced the 3 of them, then the quantity you will see it will still be 6.
3. next step: click on it to proceed with the next form (the final one).
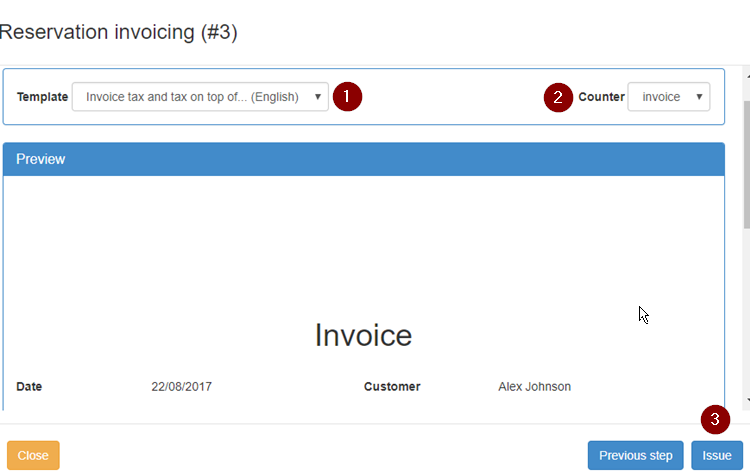
1. Template: choose the proper template among the existing ones. If you have not created your template, or none of them is proper for you, then you have to go back and create the one you need.
2. Counter: choose the proper counter. If you have not created a counter, then you have to go back and create the one you need.
3. Issue: check the preview of the invoice and then click on it to issue your final invoice. If there is a mistake, you can still go back and make any changes you want.
Choose the printout of the invoice: screen, printer, pdf or excel.
Your invoice is ready!
Reports
You can check the invoices you have issued, by accessing the reporting section.
Go to Options⇒ Reports⇒ Invoicing. The available reports are the following:
20 Invoices/receipts for period by counter: Define the time period you are interested in and you can see a report including the invoices per day and counter.
21 Invoices/receipts for period by counter (tax breakdown): Define the time period you are interested in and you can see a report including the invoices per day and the respective tax breakdown.
19 Reservation invoice/receipt: This report allows you to find and reprint an invoice considering the counter and the number.
40 Uninvoiced reservations by booking agency and arrival date for period: Define the time period you are interested in and you can see a report including the reservations by booking agency and arrival date.
41 Uninvoiced reservations by booking agency and departure date for period: Define the time period you are interested in and you can see a report including the reservations by booking agency and departure date.
Billing info agency
If you want to invoice a booking agency, you have to add the billing information of each agency.
Follow these steps to create a new customer with the invoicing details of the booking agency.
Options⇒ customers⇒ New customer
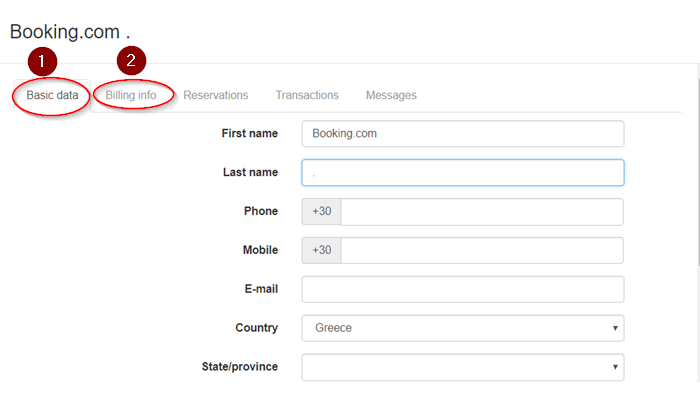
1. Basic data: fill in the basic data of the booking agency.
2. Billing info: fill in the billing info as they will be mentioned on the invoices.
and save your entry.
Then you have to match the customer you just created to the booking agency.
Go to Options⇒ Settings⇒ Booking agencies and fill in the fields mentioned below:
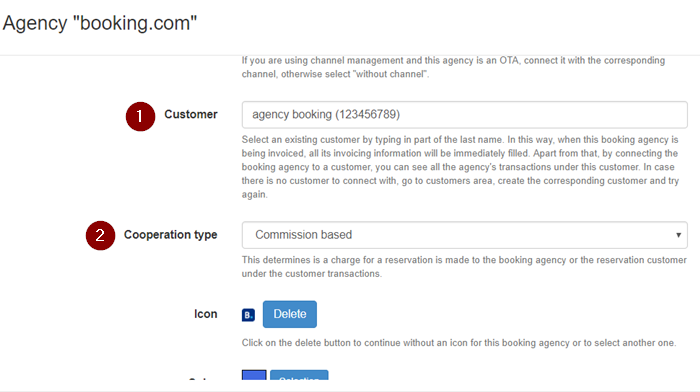
1. Customer: Type in the first letters of the name of the agency and select the one you want from the list that appears.
2. Cooperation type: hoose ‘Commission based’ or ‘the agency pays for the reservation’, according to your preferences.
and save the changes.
