Difference between revisions of "Property Setup"
(→Step 3: Price Lists) |
|||
| (45 intermediate revisions by 3 users not shown) | |||
| Line 1: | Line 1: | ||
To setup your property go to the settings page. You can access this page from two different locations: | To setup your property go to the settings page. You can access this page from two different locations: | ||
| − | [[File:accessing_settings.png|600px]] | + | [[File:accessing_settings.png|600px|border]] |
Click 'Hotel information'. Fill in your hotel’s information in this section. | Click 'Hotel information'. Fill in your hotel’s information in this section. | ||
| − | Hotel name: Type the name of your property as you want it to appear in your country (Domestic name) and the international name for your international clients. Select your country and location details and click Save. | + | '''Hotel name''': Type the name of your property as you want it to appear in your country (Domestic name) and the international name for your international clients. Select your country and location details and click Save. |
| − | [[File: | + | [[File:hotel_name_1.png|800px]] |
| − | Contact details: Fill in your contact details. You can also type another email where you would like to receive copies of outgoing e-mails. | + | '''Contact details''': Fill in your contact details. You can also type another email where you would like to receive copies of outgoing e-mails. |
| − | Price list: Choose your Rack rate (This is the official price list for reservations made directly, without any booking agency. This price list also defines the periods that the property is closed. If you don't have any price list yet, create one through the configuration area). | + | '''Price list''': Choose your Rack rate (This is the official price list for reservations made directly, without any booking agency. This price list also defines the periods that the property is closed. If you don't have any price list yet, create one through the configuration area). |
| − | Logos: Upload your logo. Click on the 'Upload' button, select your logo from your files and click OK. | + | '''Logos''': Upload your logo. Click on the 'Upload' button, select your logo from your files and click OK. |
| − | + | For the e-mail, make sure that your internet domain configuration allows hoteliga mail server to send e-mails on your behalf. Click [[Allowing hoteliga To Send E-mails On Your Behalf|here]] for more details. | |
| − | Fill in the following basic data. | + | |
| − | Title: Give a title to the price list (e.g. booking.com). | + | |
| − | Currency: Select the currency of the price list (e.g. Euro). | + | == Create price lists == |
| − | Special calendars: Select the calendar that corresponds to this price list. | + | |
| − | With weekdays: Click this if the price list is depending on weekdays (in case you have | + | You can have as many price lists as you need. Each booking agency could have each own seasons and price list. To create a price list first you have to create the seasons, then you need to create a special season calendar and then the price list. |
| − | Use gross value for special prices: Click this when special prices (e.g. early booking discount) | + | |
| + | === Step 1: Seasons === | ||
| + | To create a new season, go to settings and click 'Seasons'. Click on the 'New season' button. You can name the seasons as you like (eg. high, low, season A, season B etc.). Apply a different color to each season. Click OK. | ||
| + | If you have different seasons for different booking agencies, please set them here so you can use them in Special calendars. | ||
| + | |||
| + | [[File:Seasons.png|800px]] | ||
| + | |||
| + | === Step 2: Special calendars === | ||
| + | Special calendars are either related to seasons (seasons calendars) or have to do with a special price being active/enabled or not (yes/no calendars). They are used in different areas in the system but mainly in price lists. | ||
| + | |||
| + | Use the seasons calendar type to set the dates for the seasons, in other words to specify which dates belong to which season. | ||
| + | |||
| + | Go to settings and click 'Special calendars'. Click '''"New special calendar"'''. | ||
| + | Give a title to the seasons calendar (eg. booking.com). Select ''''Season calendar''''. Click Save. | ||
| + | |||
| + | [[File:special_calendar.png|800px]] | ||
| + | |||
| + | Move your mouse (point with your finger if you are using a smartphone or a tablet) on the button with the name of the season you want. | ||
| + | Move your mouse (point with your finger if you are using a smartphone or a tablet) to the dates you want, click and color the dates. | ||
| + | If you want to select multiple dates together, left click and hold while moving over the dates. | ||
| + | You can also use the filters (Set, as) to set up a whole month in one season etc. | ||
| + | Click OK to save the changes. | ||
| + | |||
| + | [[File:set_seasons.png|800px]] | ||
| + | |||
| + | === Step 3: Price Lists === | ||
| + | |||
| + | To create a price list go to settings and click 'Price lists'. Click the ''''New price list'''' button. | ||
| + | |||
| + | '''Basic data'''. Fill in the following basic data. | ||
| + | *'''Title''': Give a title to the price list (e.g. booking.com). | ||
| + | *'''Currency''': Select the currency of the price list (e.g. Euro). | ||
| + | *'''Special calendars''': Select the calendar that corresponds to this price list. | ||
| + | ''With weekdays'': Click this if the price list is depending on weekdays (in case you have different prices for the days of the week) or leave unchecked if the prices remain the same for every day of the week. | ||
| + | Use gross value for ''special prices'': Click this when special prices (e.g. early booking discount) are calculated on the gross value of standard rates or leave unchecked if special prices are calculated on the net value of standard rates. | ||
Click Save. | Click Save. | ||
| + | [[File:new_price_list.png|800px]] | ||
| + | |||
| + | '''Standard rates''' | ||
| + | Fill in the standard rates for each type of room per season. Click Save. | ||
| − | + | [[File:standard_rates.png|800px]] | |
| − | Fill in the standard rates for | + | |
| + | '''Extra beds''' | ||
| + | Fill in the charges for extra beds per type of room per season. You can type an absolute value in your currency for example 5€ or a percentage based on standard rates for example 10% extra charge on standard rates. Click Save. | ||
| + | |||
| + | '''Non refundable rates''' | ||
| + | Click on the tab 'Non refundable rates' and enter the non refundable prices per type of room per season. Click Save. | ||
| + | |||
| + | '''Single use rates''' | ||
| + | Click on the tab 'Single use rates' and enter the prices for single use per type of room per season. You can type an absolute value of price reduction in your currency for example 20€ or the reduction percentage, based on standard rates, for example 20% reduction on standard rates. Click Save. | ||
| + | |||
| + | '''Meals''' | ||
| + | At tab 'Meals' you can enter the prices of meals e.g. breakfast, half board, full board etc. for adults and children per season. | ||
| + | |||
| + | '''Special Prices''' | ||
| + | Click on the tab 'Special prices'. Click on the button 'New special price'. | ||
| + | Special Price: select the special price you want (e.g. early booking TUI, long stayers etc.). | ||
| + | Validity from: The starting date that the reservation can be made in order for the special pice to be valid. | ||
| + | Validity to: The last date a reservation can be made in order for the special rate to apply | ||
| + | Arrival: Choose the open/closed special calendar specifying the dates of stay for this special price to apply. | ||
| + | Click Save. | ||
| + | |||
| + | [[File:new_special_price.png|800px]] | ||
| + | |||
| + | '''Taxes''' | ||
| + | Enabled: Click to enable the calculation of taxes for the rates of this price list. | ||
| + | Included: Click this when taxes are included in the rates. Leave unchecked when taxes are not included. | ||
| + | Click Save. | ||
| + | |||
| + | |||
| + | [[File:setup_taxes.png|800px]] | ||
| + | |||
| + | '''Restrictions''' | ||
| + | Click on the tab 'New Restriction' to set limits regarding prices in special circumstances. | ||
| + | |||
| + | |||
| + | '''Cancellation Policy''' | ||
| + | Click on the tab 'New Line' to set how cancellations are enabled. | ||
Latest revision as of 09:04, 15 June 2018
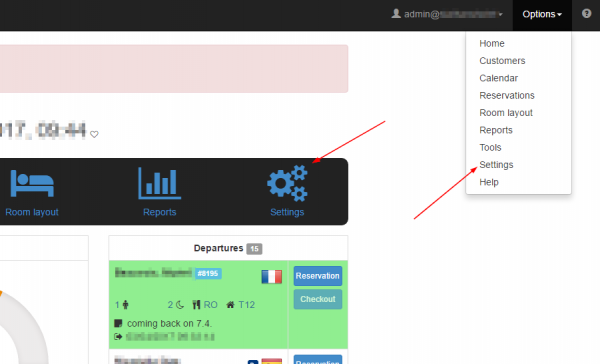
To setup your property go to the settings page. You can access this page from two different locations:
Click 'Hotel information'. Fill in your hotel’s information in this section.
Hotel name: Type the name of your property as you want it to appear in your country (Domestic name) and the international name for your international clients. Select your country and location details and click Save.
Contact details: Fill in your contact details. You can also type another email where you would like to receive copies of outgoing e-mails.
Price list: Choose your Rack rate (This is the official price list for reservations made directly, without any booking agency. This price list also defines the periods that the property is closed. If you don't have any price list yet, create one through the configuration area).
Logos: Upload your logo. Click on the 'Upload' button, select your logo from your files and click OK.
For the e-mail, make sure that your internet domain configuration allows hoteliga mail server to send e-mails on your behalf. Click here for more details.
Contents
Create price lists
You can have as many price lists as you need. Each booking agency could have each own seasons and price list. To create a price list first you have to create the seasons, then you need to create a special season calendar and then the price list.
Step 1: Seasons
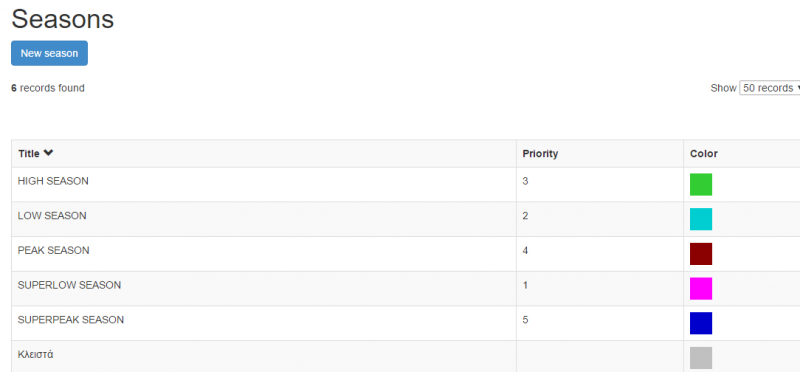
To create a new season, go to settings and click 'Seasons'. Click on the 'New season' button. You can name the seasons as you like (eg. high, low, season A, season B etc.). Apply a different color to each season. Click OK. If you have different seasons for different booking agencies, please set them here so you can use them in Special calendars.
Step 2: Special calendars
Special calendars are either related to seasons (seasons calendars) or have to do with a special price being active/enabled or not (yes/no calendars). They are used in different areas in the system but mainly in price lists.
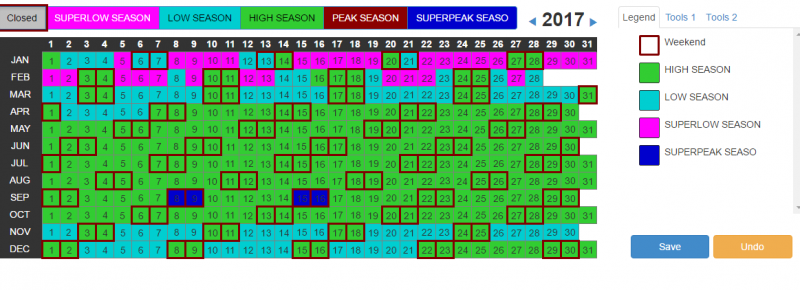
Use the seasons calendar type to set the dates for the seasons, in other words to specify which dates belong to which season.
Go to settings and click 'Special calendars'. Click "New special calendar". Give a title to the seasons calendar (eg. booking.com). Select 'Season calendar'. Click Save.
Move your mouse (point with your finger if you are using a smartphone or a tablet) on the button with the name of the season you want. Move your mouse (point with your finger if you are using a smartphone or a tablet) to the dates you want, click and color the dates. If you want to select multiple dates together, left click and hold while moving over the dates. You can also use the filters (Set, as) to set up a whole month in one season etc. Click OK to save the changes.
Step 3: Price Lists
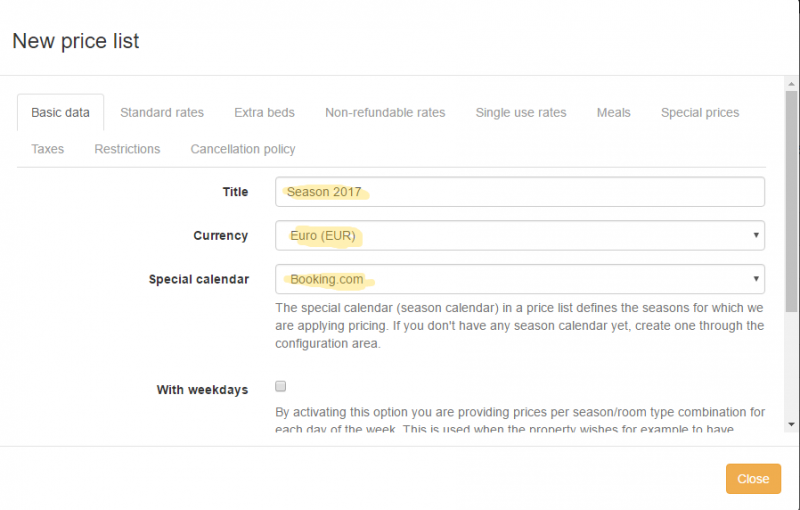
To create a price list go to settings and click 'Price lists'. Click the 'New price list' button.
Basic data. Fill in the following basic data.
- Title: Give a title to the price list (e.g. booking.com).
- Currency: Select the currency of the price list (e.g. Euro).
- Special calendars: Select the calendar that corresponds to this price list.
With weekdays: Click this if the price list is depending on weekdays (in case you have different prices for the days of the week) or leave unchecked if the prices remain the same for every day of the week. Use gross value for special prices: Click this when special prices (e.g. early booking discount) are calculated on the gross value of standard rates or leave unchecked if special prices are calculated on the net value of standard rates. Click Save.
Standard rates Fill in the standard rates for each type of room per season. Click Save.
Extra beds
Fill in the charges for extra beds per type of room per season. You can type an absolute value in your currency for example 5€ or a percentage based on standard rates for example 10% extra charge on standard rates. Click Save.
Non refundable rates Click on the tab 'Non refundable rates' and enter the non refundable prices per type of room per season. Click Save.
Single use rates Click on the tab 'Single use rates' and enter the prices for single use per type of room per season. You can type an absolute value of price reduction in your currency for example 20€ or the reduction percentage, based on standard rates, for example 20% reduction on standard rates. Click Save.
Meals At tab 'Meals' you can enter the prices of meals e.g. breakfast, half board, full board etc. for adults and children per season.
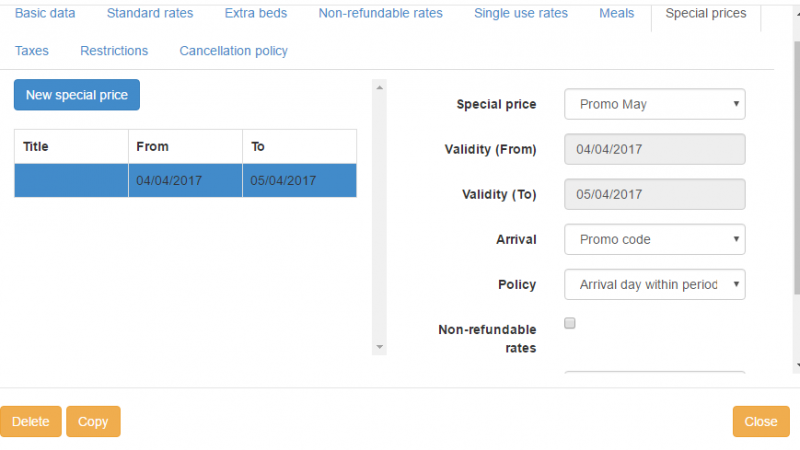
Special Prices Click on the tab 'Special prices'. Click on the button 'New special price'. Special Price: select the special price you want (e.g. early booking TUI, long stayers etc.). Validity from: The starting date that the reservation can be made in order for the special pice to be valid. Validity to: The last date a reservation can be made in order for the special rate to apply Arrival: Choose the open/closed special calendar specifying the dates of stay for this special price to apply. Click Save.
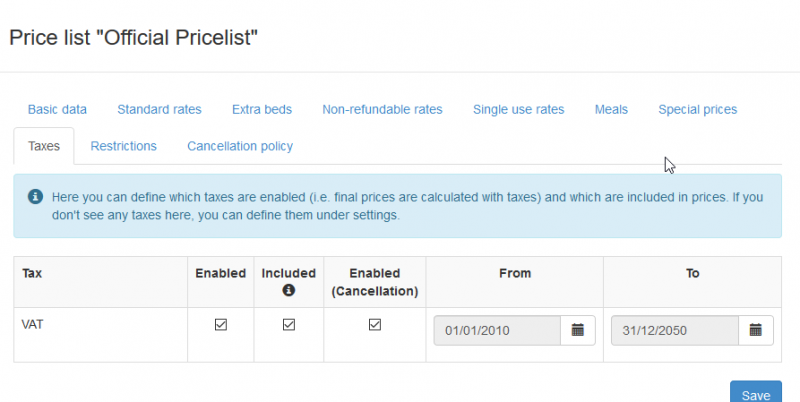
Taxes Enabled: Click to enable the calculation of taxes for the rates of this price list. Included: Click this when taxes are included in the rates. Leave unchecked when taxes are not included. Click Save.
Restrictions Click on the tab 'New Restriction' to set limits regarding prices in special circumstances.
Cancellation Policy
Click on the tab 'New Line' to set how cancellations are enabled.
