How to Connect an Airbnb Account and its Listings
This tutorial is for adding new AirBnb connection to hoteliga account.
To make a new connection you have to follow next steps.
Contents
Managing Accounts
Authorizing AirBnb Account
At this moment you are supposed to already have an AirBnb account.
To add a new connection you need to go to Channel Manager area (Options ⇒ Channel Manager). You should see the AirBnb (Official) area. If you don't, it means you don't have permission to create an AirBnb channel (please contact us for more information).

As the next step you need to go to Accounts page (first button in AirBnb (Official) area).
You will see an empty page with red button "Connect with Airbnb":

1) Before clicking the button, it is advised to be logged in to your AirBnb account.
2) After clicking on "Connect with Airbnb" you will be redirected to the Airbnb page, where you will give access to hoteliga:

3) After giving access you will be redirected back to account list:

The account was authorized successfully.
To add another account repeat 1-3 steps above.
Unauthorizing AirBnb Account
To disconnect an Airbnb account, go to Accounts and click on the account you want to disable and select "Disconnect account":

After disconnecting successfully no information about this account will be available to hoteliga.
You can remove access from hoteliga of an account from your Airbnb control panel:

If you do so, you also have to remove this account from hoteliga by clicking "Remove disconnected account" (Accounts page).
Managing Listings
Listings, in Airbnb, are equivalent and connected to room types in hoteliga. If a room type has more than one room, then all of them should offer the same amenities and services.
Airbnb will be updated with the number of available rooms for listings mapped to room types.
For example you have 3 listing in your Airbnb account:

Inside of hoteliga listings (Channel Manager ⇒ Listings (second button in AirBnb section)) you will see all Airbnb listings from all authorized accounts:

The meaning of columns are:
- Listing name - the name you have set inside Airbnb account for a listing
- Account email - the email of the authorized account
- Room type - associated hoteliga room type title (when listing is connected)
- Available - if a listing is available, no - listing is not available, and no reservation can be made
- Connected - if a listing is connected, that is prices and inventory are managed through hoteliga
- Channel name - the channel name which will be created in hoteliga and associated with airbnb listing
- Sync category:
- Disconnected - a listing is not managed by hoteliga
- Limited - hoteliga sends updates only about prices and availability
Connecting an AirBnb listing
When you click on a listing you will see a modal, where you can edit only 3 fields: room type (hoteliga room type), connected and available switch buttons.

To connect a listing with hoteliga you should choose a hoteliga room type and enable connected.

When you reopen window you will see that Available is also enabled and there is an associated channel and also sync category is Limited.

The field Approved means that from AirBnb side this listing was checked for minimum required information (title and at least one photo). If there is no photo, instead of approved you will see rejected and below in Approval notes the reason why this listing was rejected. "Rejected" means no reservation can be made for this listing.
You can also make the listing unavailable, but it still will be managed through hoteliga. "Unavailable" is like the same as a closed property.
Now from your hoteliga domain you can manage an AirBnb listing.
Managing AirBnb Channel
After connecting a listing an associated record in Channels (Options ⇒ Channel Manager ⇒ Channels) will be created:

When you disconnect a listing, the associated record will be deleted from Channels.
Here, you can change channel title.
- Channel property ID - is the associated listing ID
- account_id - the host's ID (AirBnb account ID)
- inventory_count - more than one room of this room type are available (should be 0 or 1):
- 0 - means that mapped room type has only one room and AirBnb will be updated if the room type is available or not
- 1 - means that mapped room type has more than one rooms and AirBnb will be updated with how many rooms are available

For this channel, the room type mapping will, also, be created automatically. Here, you can also change the mapped room type:

You also need to map rates inside of "Price list" tab. For AirBnb there is only one rate.

After connecting a listing
After successfully connecting a listing, so that is managed through hoteliga, create a booking agency and a price list for Airbnb, if they are not created already.
Then create a contract for the newly created channel.
Upload available rooms
After setting target sales for this room type in the contract (Settings => Contracts) select "Save" in the "Rooms" tab, so that Airbnb gets updated with the current room availability.
Upload prices
Upload prices to Airbnb by selecting "Save" in the "Price list" tab inside the related contract.
Seasonal Rules
Seasonal Rules are pricing and/or availability rules that are created on account level and can be applied for a specific time period over listings.
In order to review the existing seasonal rules, for all authorized accounts, select "Seasonal Rules" (Channel Manager => Seasonal Rules).

Create a Seasonal Rule
Select the "New Seasonal Rule". In the modal that will open, the minimum required fields is a title and the e-mail of the account to which the new rule will be added.
Note, that seasonal rules can be applied only to listings of the account, to which they belong. "Rule id" can not be selected or modified, since it is determined from Airbnb.


- Title - is the selected naming of the seasonal rule
- Rule id - can not be selected or modified, since it is a unique identifier determined from Airbnb.
- Color - select the color that will be applied to the days that this rule is applied to (calendar in Airbnb page)
- E-mail - the e-mail of the account for which the rule will be created
- Pricing Rules
- Seasonal adjustment - a percentage or fixed amount applied to the base nightly price (daily or custom price)
- Length-of-stay adjustment - a percentage or fixed amount applied to the adjusted seasonal price if they stay a specified length of time
- Last-minute discount - modify the adjusted seasonal price by a percentage or fixed amount if guests book within a specified date/time of their stay
- Booking-ahead discount - deduct a percentage or fixed amount from the adjusted seasonal price if they book before a specified date/time before their stay
- Availability Rules
- Closed on arrival - days of the week when guests cannot check-in
- Closed on departure - days of the week when guests cannot check-out
- Max nights - for each day of the week, the maximum nights guests can stay if they check-in on that day
- Min nights - for each day of the week, the minimum nights guests can stay if they check-in on that day
When adding pricing rule(s), remember to click on the "Add" button so that is added. After creating the desired pricing and/or availability rules click on "Save".
Update a Seasonal Rule
Select the desired rule and apply the desired modifications. "Rule id" and "E-mail" fields can not be updated. After applying changes click on "Save".
Delete a Seasonal Rule
Select the desired rule and click on the "Delete" button.
Applied Seasonal Rules
In order to review the applied seasonal rules on a listing, select the desired listing from listings' list (Channel Manager => Listings).
In the modal select the "Seasonal Rules" tab. Here you can review, which rule and over which time period(s) is applied.

In order to apply a Seasonal Rule select one from the "Title" dropdown menu, select the time period for which you want to be applied and select "Add".

The same rule can be applied for different time periods. If applying multiple rules for the same time period, the latest one will take effect.
In order to remove applied Seasonal Rules, select the desired time period and click on "Delete" button.

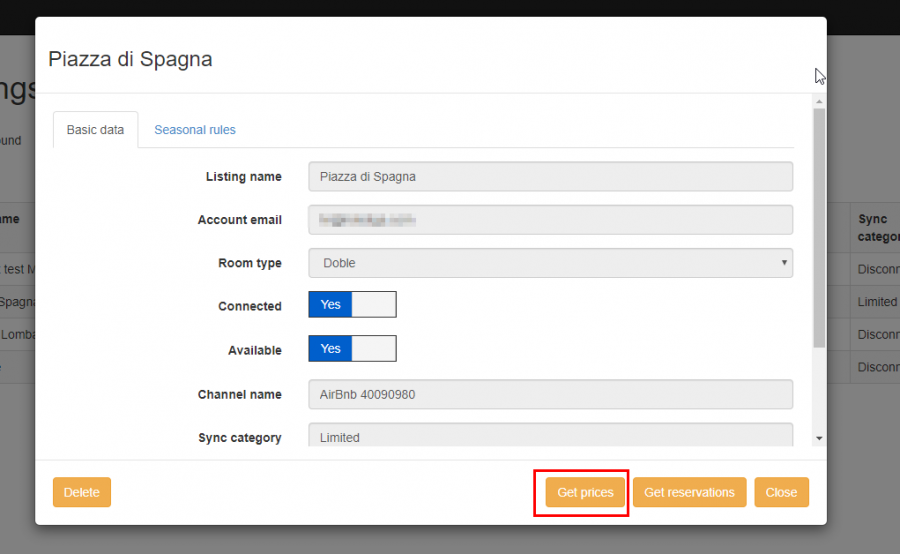
Getting Prices from AirBnb
Navigate to available listings (Channel Manager ⇒ Listings) and select a connected listing.
Selecting "Get Prices" will retrieve the prices that are set for this listing for the next two(2) years and will update accordingly the related hoteliga price list.
In order to use this feature, it is required that listing is connected and there is already a contract for the related channel.

Getting Reservations from AirBnb
Navigate to available listings (Channel Manager ⇒ Listings) and select a connected listing.
Selecting "Get Reservations" will retrieve and register in hoteliga all future reservations made for this listing.
